
Stop the Leak with This Easy Sink Drain Plug Replacement
Fix slow leaks fast with this step-by-step sink drain plug replacement guide for any bathroom sink.

When a Sink Drain Plug Goes Bad, Here's What to Do
A sink drain plug replacement is one of the most common small plumbing repairs homeowners and property managers face — and the good news is that most people can handle it in 30 to 60 minutes with basic tools.
Here's the quick answer if you're in a hurry:
- Identify your stopper type — pop-up, push-pop, lift-rod, or grid
- Gather your tools — adjustable wrench, pliers, bucket, towels, and your replacement part
- Disconnect the old assembly — remove the P-trap, pivot rod, and locknut
- Seal the new drain — use plumber's putty or silicone depending on your sink material
- Reinstall and test — check for leaks at the flange, locknut, and all slip connections
The problem usually starts small. A slow drain. A stopper that won't hold water. A drip under the cabinet that you keep ignoring. Left alone, even a minor drain plug failure can lead to water damage under the sink or behind drywall.
The fix is almost always straightforward — if you know what type of drain you have and which parts need replacing.
I'm Jacob Reese, Vice President at Standard Plumbing Supply in Salt Lake City. Through years of working closely with contractors and property managers on everything from routine maintenance to full supply chain operations, sink drain plug replacement parts are among the most frequently sourced items we help teams get right the first time. In the sections below, I'll walk you through exactly what to do — from identifying your drain type to testing for leaks after installation.
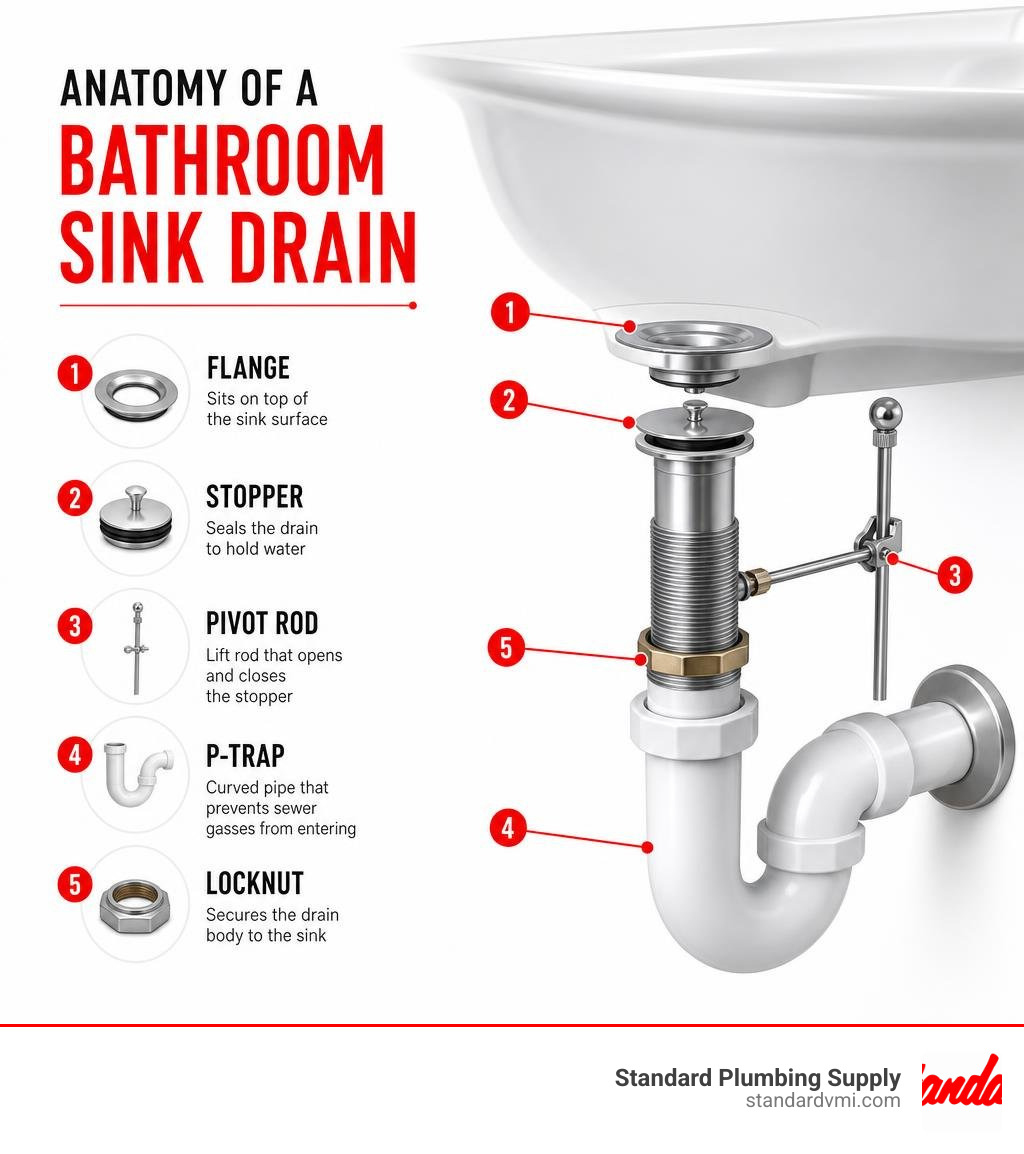
Understanding Bathroom Sink Drain Stopper Types
Before you run out to one of our Standard Plumbing Supply locations in West Jordan, Sandy, or Orem to buy a new assembly, you need to know what you are looking at. Not all bathroom sink drains are built the same way.
The first step in any successful sink drain plug replacement is identifying the specific mechanism your sink uses. There are four primary configurations you will encounter:
- Pop-Up (Lift-Rod) Drains: These are the traditional mechanical systems operated by pulling a vertical rod located behind the faucet.
- Push-Pop (Click-Clack) Drains: These modern stoppers operate with an internal spring-loaded mechanism. You simply push down on the stopper to seal it, and push it again to release it.
- Lift-and-Turn Drains: Often found in utility sinks or tubs, these require you to lift the plug up and twist it slightly to lock it open.
- Grid Strainers: These do not plug the sink at all. Instead, they feature a flat, perforated metal grate that allows water to drain continuously while catching hair and debris. They are incredibly common in commercial restrooms and vessel sinks.
Another critical factor is whether your sink has an overflow port. The overflow is the small hole near the rim of the sink basin that prevents water from spilling onto the floor if the faucet is left running. If your sink has an overflow hole, you must purchase a drain body with an open overflow port. If you have a solid vessel sink without an overflow, you must purchase a drain body without one. Installing a drain with an overflow port on a sink without an overflow will result in water leaking directly onto your bathroom floor.
| Drain Stopper Type | Mechanism | Best Suited For | Overflow Compatibility |
|---|---|---|---|
| Pop-Up / Lift-Rod | Mechanical linkage (pivot rod & clevis strap) | Standard residential sinks | Usually with overflow |
| Push-Pop | Internal spring (push to seal/release) | Modern vessel & pedestal sinks | Available in both styles |
| Grid Strainer | Perforated grate (no closing option) | Commercial & high-traffic sinks | Available in both styles |
Pop-Up and Lift-Rod Assemblies
The classic mechanical pop-up assembly relies on a series of linkages hidden beneath your sink. When you pull up on the lift rod behind your faucet, it pulls a vertical metal strap (called a clevis strap) upward. This strap is connected to a horizontal pivot rod that penetrates the back of your drain tailpiece.
Inside the drain body, the end of the pivot rod slips through an offset stirrup or plastic loop at the bottom of the stopper. As the pivot rod tilts, it acts as a lever, pulling the stopper down to seal the drain or pushing it up to open it.
Because of all these moving parts, pop-up assemblies are the most prone to catching hair, soap scum, and mineral deposits. Over time, the metal linkages can rust or slip out of alignment, causing the stopper to sit crookedly or fail to seal. For a deep dive into how these components align, check out this Plumbing Resource Guide.
Push-Pop and Grid Drains
If you want to simplify your life and eliminate under-sink mechanical linkages altogether, push-pop and grid drains are excellent alternatives.
Push-pop drains feature an internal spring mechanism. Many modern designs, like those we stock from top manufacturers, allow you to unscrew the stopper cap with a quick quarter-turn. This makes cleaning out hair and debris incredibly easy compared to traditional pop-up systems.
Grid strainers are the ultimate low-maintenance option. Because they cannot close, there are no mechanical parts to fail, no gaskets to wear out, and no risk of accidental overflows. They are the standard choice for public restrooms, but they are also highly popular in modern residential vessel sinks. If you are converting a kitchen or utility sink, you can learn more about these strainers from this guide on How to Install a Drain Strainer.
Choosing the Right Sink Drain Plug Replacement
When purchasing your sink drain plug replacement, bring your old parts with you to the plumbing supply counter if possible. If you can't, keep these four specifications in mind:
- Tailpiece Diameter: Standard bathroom lavatory drains are almost always 1-1/4 inches in diameter. Utility and kitchen sinks typically use 1-1/2 inch or larger tailpieces.
- Overflow vs. Without Overflow: Look closely at your sink basin. If there is an overflow hole near the top, make sure your new drain body has the matching cutout windows in the thread area.
- Finish Matching: Match the exposed metal flange and stopper to your existing faucet. Common finishes include Chrome, Brushed Nickel, Matte Black, and Oil Rubbed Bronze.
- Material Quality: Avoid cheap plastic assemblies if your budget allows. Brass and high-grade stainless steel drains tighten down crisply, resist corrosion, and last significantly longer.
For more on selecting the right parts, read this article on How to Install or Replace a Bathroom Sink Drain.
Step-by-Step Sink Drain Plug Replacement Guide
Now that you have your new parts, it is time to roll up your sleeves. A sink drain plug replacement is a highly satisfying DIY project, but it does require careful attention to detail to ensure a watertight finish.
Before you begin, gather the following tools and materials:
- Adjustable wrench
- Channel-lock pliers
- Bucket (to catch standing water)
- Old towels or rags
- Isopropyl alcohol (for cleaning)
- Plumber's putty or 100% silicone sealant
- Thread seal tape (plumber's tape)
Safety First: Clear everything out from under the sink cabinet so you have ample room to work. Lay down a dry towel and place your bucket directly beneath the P-trap.
Removing the Old Drain Assembly Safely
To remove the old assembly without damaging your plumbing or cracking the sink basin, follow this sequence:
- Disconnect the Linkage: Underneath the sink, locate the metal clevis strap hanging down from the lift rod. Pinch the spring clip and slide the horizontal pivot rod out of the strap.
- Remove the P-Trap: Place your bucket under the P-trap. Loosen the plastic or brass slip nuts on the trap assembly using your channel-lock pliers (or by hand if they are plastic). Gently pull the P-trap down and empty any standing water into your bucket.
- Unscrew the Pivot Rod Nut: Unscrew the retaining nut holding the horizontal pivot rod to the drain pipe. Pull the pivot rod straight out. You can now reach into the sink basin and pull the old stopper straight up and out.
- Loosen the Locknut: Under the sink, find the large metal or plastic locknut holding the drain body to the bottom of the sink basin. Use your pliers or an adjustable wrench to loosen this nut. Spin it all the way down the threads.
- Extract the Drain Body: Push the drain body upward from the bottom. This will break the seal of the old putty or silicone under the top flange. From the top of the sink, grab the flange and lift the entire assembly out.
- Prep the Surface: Use a plastic putty knife or scraper to remove all traces of old plumber's putty, silicone, and mineral buildup from the sink drain opening. Wipe the area clean with isopropyl alcohol and let it dry completely. A clean surface is critical for a leak-free seal.
Sealing the Flange with Putty or Silicone
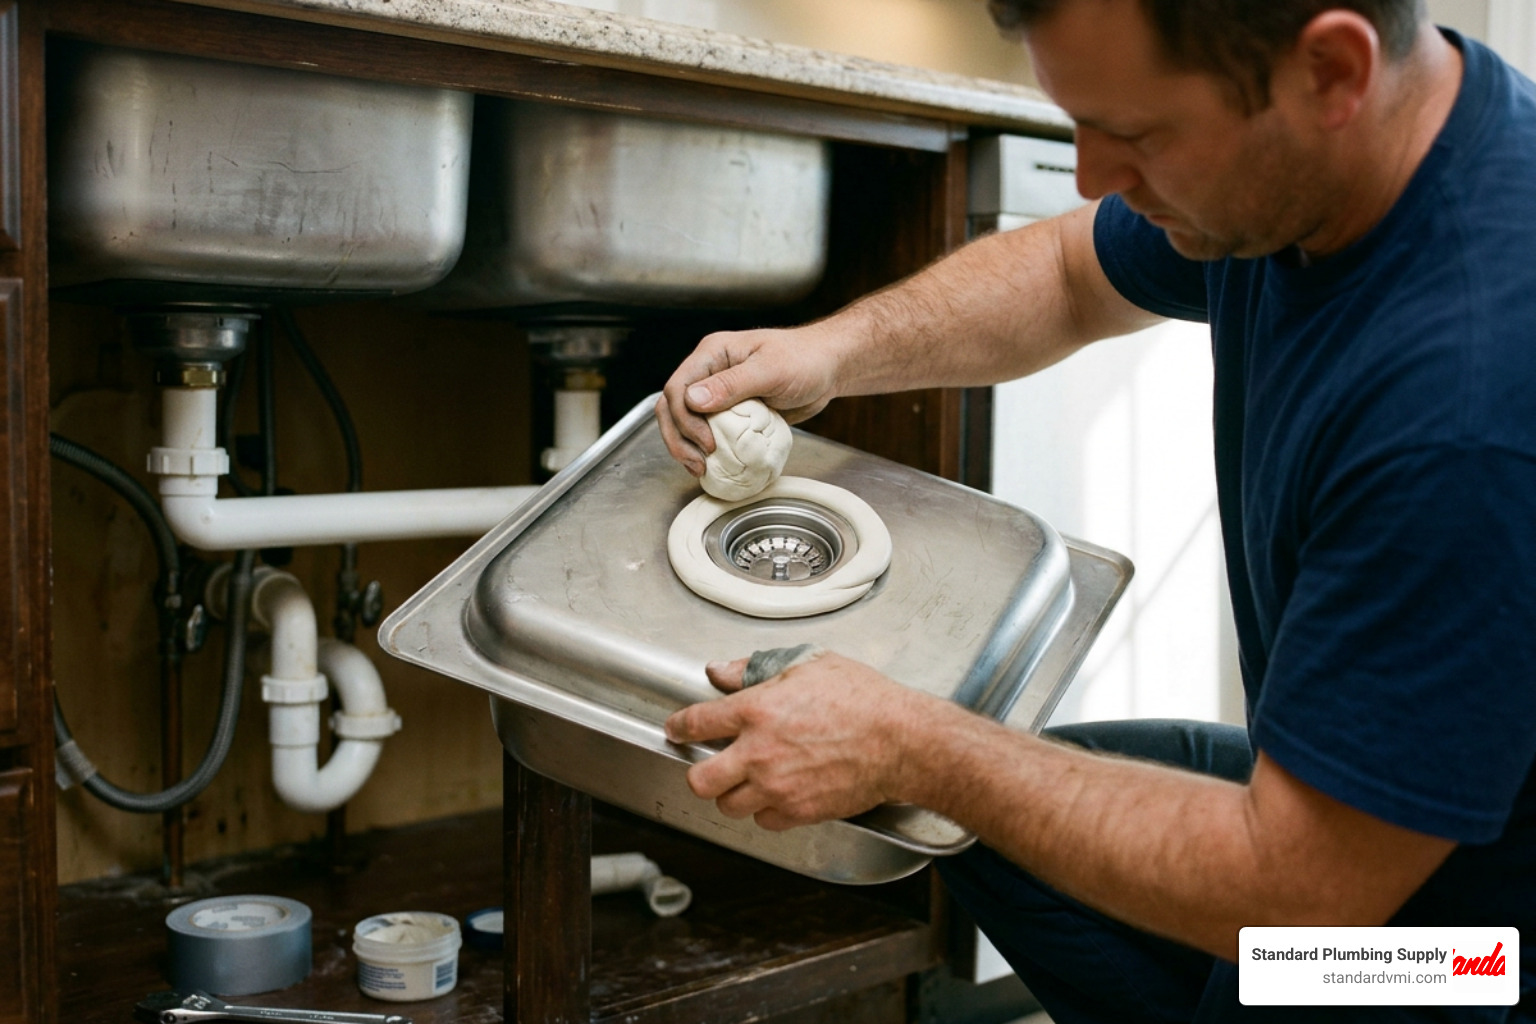
One of the most debated topics in plumbing is whether to use plumber's putty or silicone to seal the upper drain flange to the sink basin.
- Plumber's Putty: This is the traditional choice. It is easy to work with, highly pliable, and makes future removal simple. To use it, roll a golf-ball-sized piece of putty between your hands until it forms a uniform rope about 1/4-inch thick. Wrap this rope in a continuous ring around the underside of the new drain flange.
- 100% Silicone Sealant: Silicone is highly recommended—and often required—for porous stone sinks (like granite, marble, or quartz) and composite materials. Plumber's putty contains oils that can seep into and permanently stain porous stone. Apply a continuous bead of silicone around the underside of the flange.
Once your sealant is applied, push the flange firmly down into the sink's drain opening. Underneath the sink, slide the thick rubber gasket (beveled side facing up toward the sink), the plastic friction ring, and the metal locknut onto the drain body.
Pro-Tip: The plastic friction ring must go between the rubber gasket and the metal locknut. This prevents the locknut from binding or tearing the rubber gasket as you tighten it.
Installing the New Drain Body and Pivot Rod
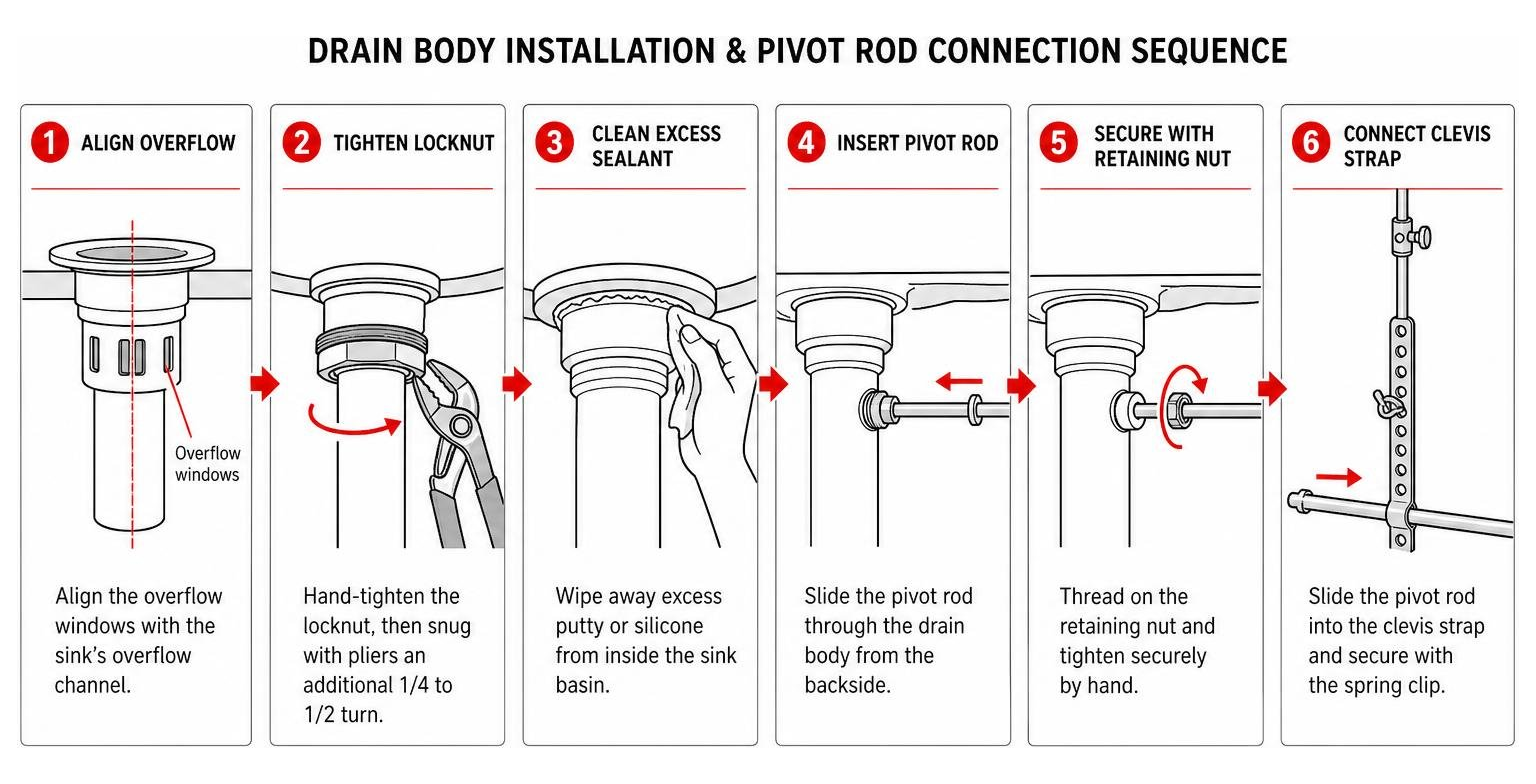
With the flange pushed down and the under-sink hardware in place, follow these steps to secure the new drain body:
- Align the Overflow: Before tightening the locknut, look under the sink and ensure the overflow windows in the drain body are perfectly aligned with the sink's internal overflow channel. If they are misaligned, your overflow will not work, and standing water can become trapped inside the sink casting.
- Tighten the Locknut: Hand-tighten the locknut as far as it will go. Use your channel-lock pliers to snug it up an additional 1/4 to 1/2 turn. Do not over-tighten, especially on porcelain or ceramic sinks, as this can easily crack the basin.
- Clean Excess Sealant: As you tighten the locknut, excess putty or silicone will squeeze out from under the flange inside the sink basin. Use your finger or a soft rag to wipe away the excess.
- Install the Pivot Rod: Insert the stopper into the drain from above. Underneath the sink, insert the horizontal pivot rod into the drain pipe opening, making sure the plastic ball sits securely against the gasket. Ensure the tip of the rod passes through the loop or stirrup at the bottom of the stopper. Tighten the pivot rod retaining nut by hand, then snug it slightly with pliers. It should be tight enough to prevent leaks, but loose enough that the rod can move up and down freely.
- Connect the Linkage: Slide the metal clevis strap onto the vertical lift rod. Pinch the spring clip and slide the horizontal pivot rod through one of the holes in the clevis strap. Adjust the height so that when the lift rod is completely down, the stopper is fully open.
Testing Your New Sink Drain Plug Replacement
Do not put your under-sink items back just yet! Testing your sink drain plug replacement is the most important step of the entire process.
First, reinstall your P-trap. Ensure the beveled washers are facing the correct direction and hand-tighten the slip nuts. Once everything is connected, perform these three tests:
- The Run Test: Turn on the faucet and let water run freely for 60 seconds. Watch the joints under the sink closely. Feel around the locknut, the pivot rod nut, and the P-trap connections with a dry hand. Any moisture indicates a loose connection.
- The Fill and Release Test: Pull the lift rod to close the stopper. Fill the sink basin to the rim. Let it sit for 5 minutes to ensure the stopper holds a tight seal. Then, release the stopper all at once. The sudden rush of high-volume water puts maximum pressure on your plumbing joints and will quickly expose any hidden leaks.
- The Dye Test: If you suspect a microscopic leak but cannot see it, dry all the pipes completely. Add a few drops of food coloring to the water in the basin. Wrap a dry white paper towel around each joint under the sink. If there is a leak, the colored water will stain the paper towel, showing you exactly which connection needs adjustment.
Troubleshooting Common Post-Installation Issues
If your new drain isn't performing perfectly right out of the gate, don't panic. Most post-installation issues are caused by minor alignment errors or over-tightened components. If you are dealing with a leak, check out this troubleshooting guide on Why is My Drain Plug Leaking? for quick fixes.
Fixing Slow Drains and Misalignments
If your sink is draining incredibly slowly after your sink drain plug replacement, the culprit is usually one of two things:
- Misaligned Overflow Port: If the drain body was not rotated correctly during installation, the overflow port in the drain pipe may be partially blocked by the sink's casting. This prevents air from entering the system, creating a vacuum that slows down drainage. You will need to loosen the locknut, rotate the drain body to align the port, and re-tighten.
- Stopper Sitting Too Low: If the stopper does not lift high enough when you activate the mechanism, water cannot escape quickly. To fix this, get under the sink and adjust the clevis strap. Move the horizontal pivot rod to a lower hole on the strap, or loosen the clevis screw and slide the strap higher up on the vertical lift rod.
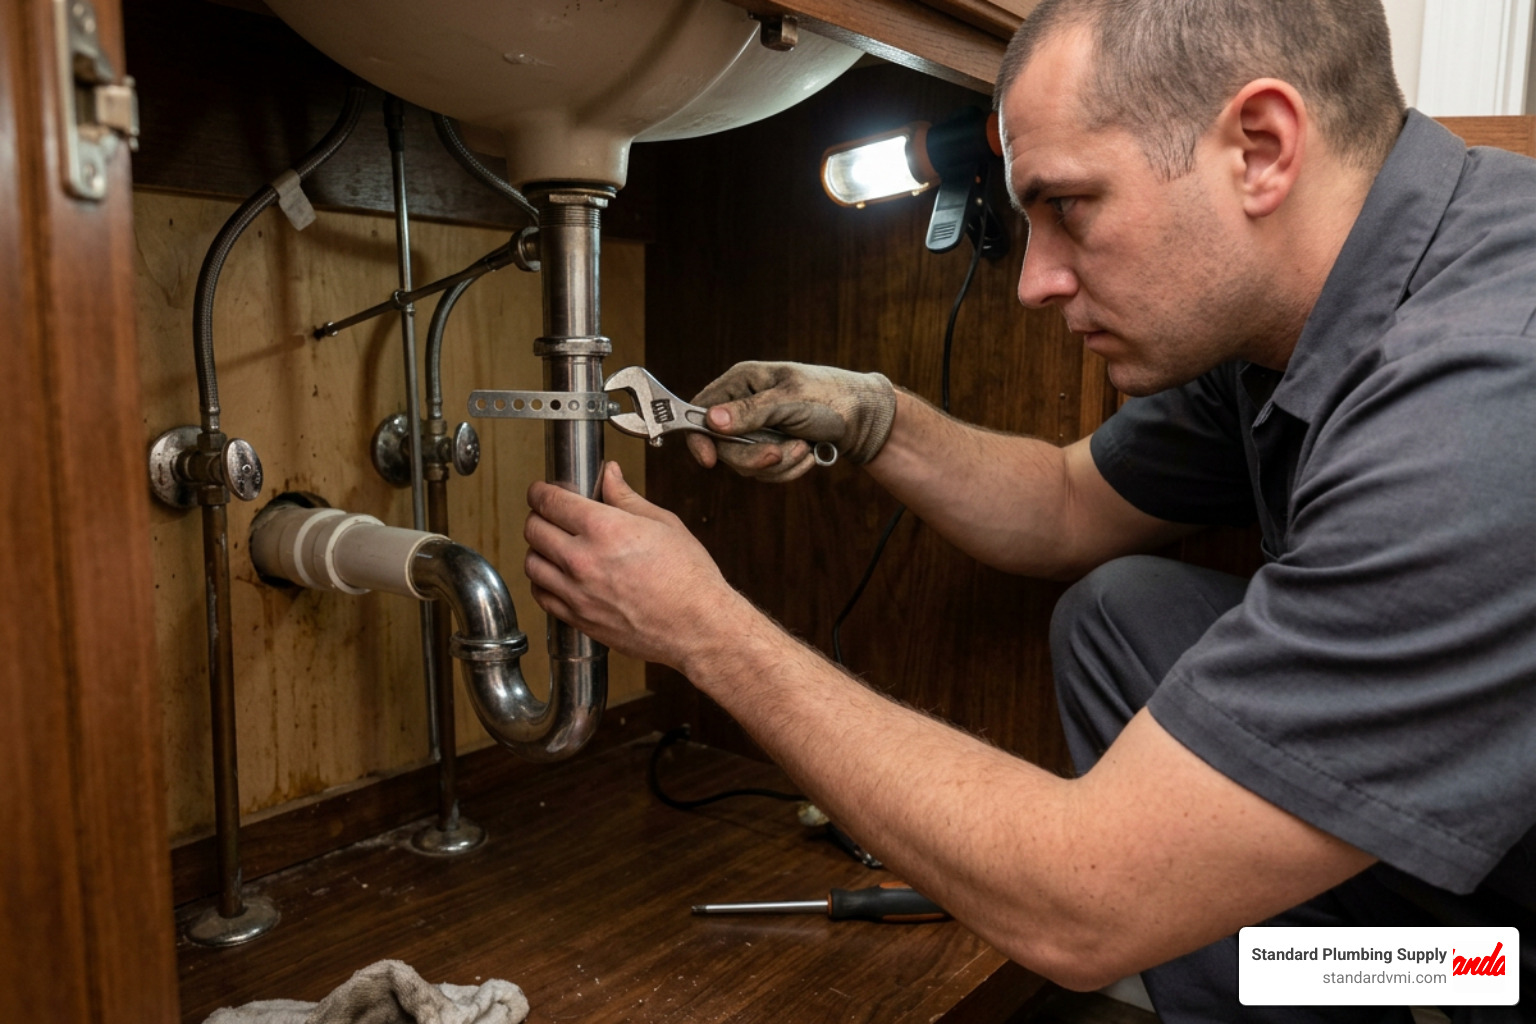
Resolving Persistent Drips and Leaks
A persistent drip under the sink usually points to a gasket or sealant issue:
- Drip at the Locknut: If water is dripping from the large locknut under the sink, the rubber gasket is likely misaligned, or there is insufficient plumber's putty/silicone under the top flange. Try tightening the locknut slightly. If the leak persists, you will need to disassemble the drain, clean off the sealant, and apply a fresh, uniform layer.
- Drip at the Pivot Rod Nut: If water is weeping from the pivot rod nut, the internal plastic ball or its rubber seat may be worn or seated crookedly. Loosen the nut, adjust the ball, and re-tighten. If it still leaks, wrap a small amount of thread seal tape around the threads before tightening.
- P-Trap Leaks: If the slip joints on your P-trap are leaking, check the condition of the beveled plastic washers. If they are cracked or stiff, replace them. If you need local hands-on help with stubborn plumbing fixtures, contact the experts at Faucet & Sink Repair Services.
Frequently Asked Questions
Can I replace a sink drain plug without a plumber?
Absolutely! Replacing a sink drain plug is a beginner-friendly DIY project that typically takes between 30 and 60 minutes. You only need basic household tools like pliers and an adjustable wrench. However, if your existing pipes are heavily corroded copper or cast iron, or if you run into frozen fittings that refuse to budge, calling a professional is a smart move to avoid damaging your home's main plumbing lines. For a detailed homeowner walkthrough, check out How To Replace Drain Plug In Bathroom Sink.
Should I use plumber's putty or silicone to seal the drain?
For standard ceramic, porcelain, or stainless steel sinks, plumber's putty is the go-to choice because it is incredibly easy to work with and clean up. However, if you have a porous stone sink (like granite, marble, slate, or quartz), you must use 100% silicone sealant. The oils in plumber's putty can penetrate and permanently stain natural stone. Always check your sink manufacturer's guidelines before choosing a sealant.
Why is my new sink drain plug leaking underneath?
The most common cause of under-sink leaks is a misaligned rubber gasket or a missing friction ring. The plastic friction ring must sit between the rubber gasket and the metal locknut to prevent the gasket from twisting and puckering as you tighten the nut. Other culprits include a loose mounting nut, insufficient sealant under the top flange, or a misaligned P-trap.
Conclusion
A sink drain plug replacement is an easy, highly rewarding weekend project that can instantly stop annoying leaks, improve drainage, and refresh the look of your bathroom. By taking the time to identify your drain type, choosing the right sealant, and checking your connections with a thorough leak test, you can achieve professional-grade results on your own.
At Standard Plumbing Supply, we have been supporting DIYers, professional contractors, and property managers across Utah, Idaho, Wyoming, Colorado, Nevada, Oregon, California, Arizona, and Nebraska for decades. Whether you need a simple replacement gasket or a complete commercial-grade drain assembly, we stock the trusted brands and high-quality parts you need to get the job done right.
If you manage multiple properties or run a busy contracting business, ask us about our custom inventory solutions designed to keep your team fully stocked without tying up your cash flow. Learn more about how we can streamline your operations by visiting our Standard Plumbing Supply VMI Solutions page today!