
Don't Get Trapped: A Visual Guide to Plumbing P-Trap Diagrams
Learn how a plumbing p-trap diagram works to block sewer gases, with code-compliant installation steps, venting rules, and troubleshooting tips.

Understanding a Plumbing P-Trap Diagram: Anatomy and Water Seal Basics
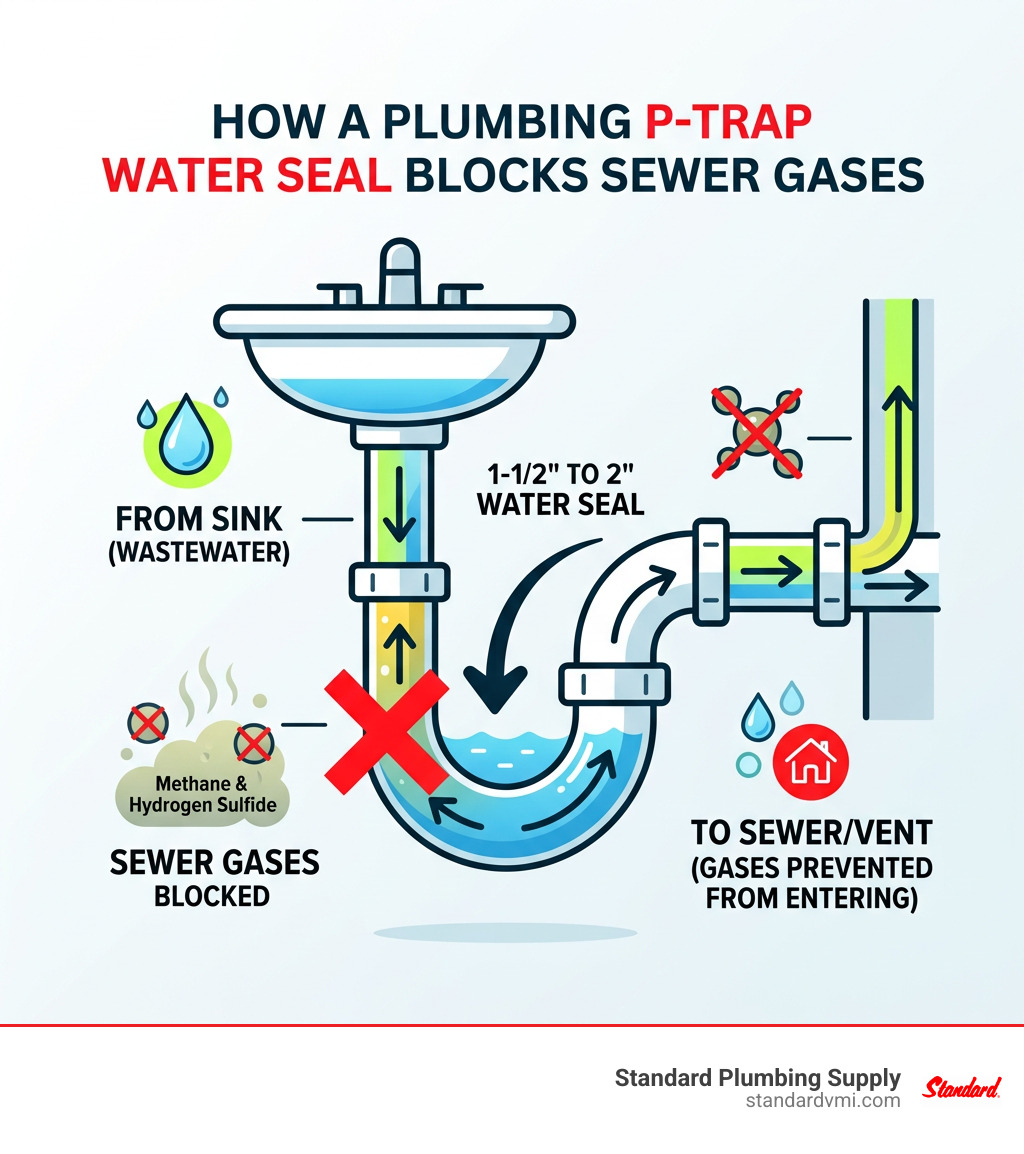
A plumbing p-trap diagram maps out the standard drain-waste assembly beneath a sink, tub, or commercial fixture. It visually explains how wastewater flows out while keeping dangerous sewer gases from flowing back inside.
Every standard schematic contains three core sections:
- Inlet Tailpiece: The vertical pipe section connecting the fixture drain to the trap.
- U-Bend (Trap Dip): The curved base that permanently holds a 1-1/2-inch to 2-inch water seal, creating an airtight barrier against methane and hydrogen sulfide.
- Trap Arm & Wall Connection: The horizontal leg that pitches downward at a 1/4-inch per foot slope into the wall sanitary tee and vent stack.
Whether you run rental maintenance crews or manage plumbing inventory for commercial properties, reading these schematics correctly prevents dry traps, venting failures, and costly leaks.
I’m Jacob Reese, Vice President at Standard Plumbing Supply, where I work directly with contractors and facility managers to solve drain-waste-vent challenges and stock the right parts for every plumbing p-trap diagram they encounter. In this guide, we'll walk through how to interpret these schematics, balance hydraulic venting, and install durable, code-compliant assemblies across all your jobs.
How to Read a Plumbing P-Trap Diagram: Anatomy & Flow
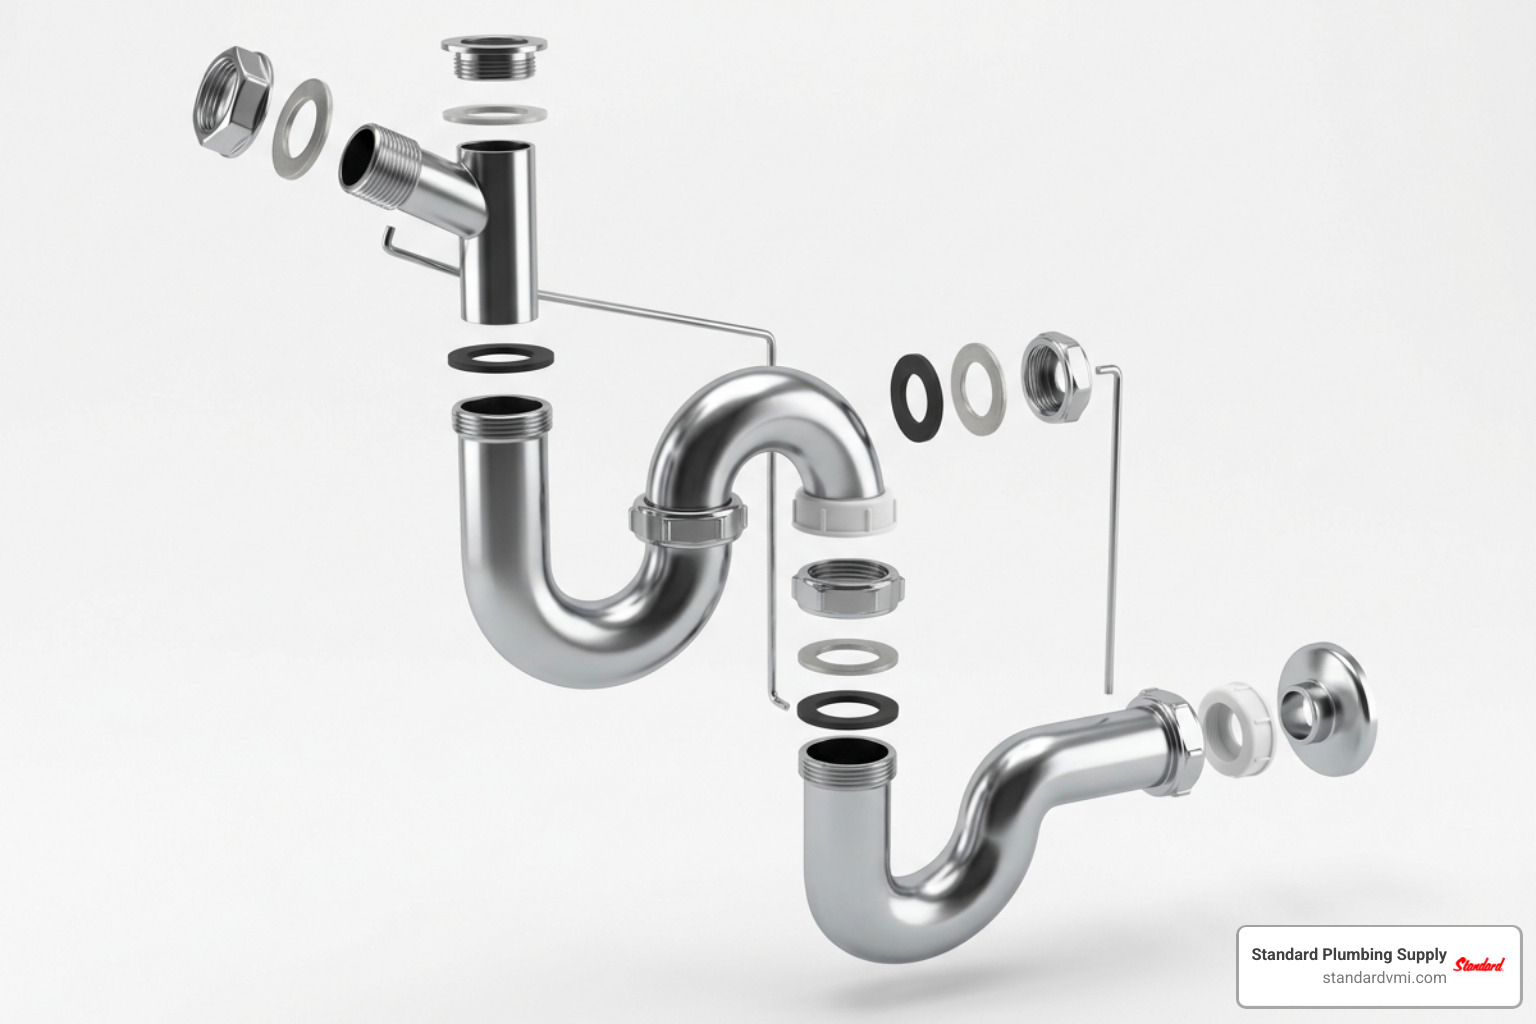
Reading a plumbing schematic starts with tracing the wastewater pathway from the fixture outlet down to the drainage stack. In any standard diagram, you will find specific mechanical fittings engineered to maintain an airtight seal while allowing free drainage:
- Inlet Tailpiece: Connects directly to the drain flange or strainer basket.
- J-Bend (U-Bend): The curved section that forms the trap dip. Think of it as a tiny, permanent moat that blocks sewer fumes.
- Trap Weir (Crown Weir): The lowest point on the upper interior surface of the horizontal trap outlet. The vertical distance between the dip and the weir determines your trap seal depth.
- Trap Arm (Wall Tube): The horizontal pipe carrying graywater from the trap weir into the wall rough-in.
- Slip Joint Hardware: Includes threaded slip nuts and beveled compression washers made of rubber or polyethylene, which compress against the pipe walls to make a watertight joint without solvent welding.
Essential Components in a Bathroom Plumbing P-Trap Diagram
Bathroom vanities typically utilize a compact 1-1/4-inch nominal pipe diameter to match typical lavatory flow rates. When installing a vanity drain, you connect the sink basin to a plastic lavatory pop-up assembly. The tailpiece drops down directly into the tubular slip-joint J-bend.
Because vanity cabinets often have tight clearances around drawers and shelving, bathroom schematics prioritize adjustable slip joints. The wall tube extension slides horizontally into a threaded trap adapter (often called a desanco fitting or marvel connector) cemented to the wall rough-in pipe. This slip connection allows you to adjust depth and angle during rough-in alignment.
Interpreting a Kitchen Sink Plumbing P-Trap Diagram
Kitchen sink schematics handle higher volume, food solids, and grease, requiring a larger 1-1/2-inch nominal pipe diameter. Dual-basin sinks introduce additional components before the trap:
- Continuous Waste Pipe or End-Outlet Tee: Ties two basins into a single drainage path using a directional baffle tee.
- Garbage Disposal Branch: Discharges food waste into the continuous waste line above the trap inlet.
- Removable Cleanout Plugs: Positioned at the bottom of the J-bend for quick retrieval of dropped items and easy cleanout access.
For heavy-duty residential and commercial kitchen setups, using a durable brass waste arm ensures long-term resistance to high water temperatures and corrosive kitchen chemicals.
Plumbing Codes, Venting Schematics, and S-Trap vs. P-Trap Rules
Plumbing codes, including the International Plumbing Code (IPC) and Uniform Plumbing Code (UPC), mandate strict parameters for trap design to maintain public health.
| Feature / Metric | Code-Compliant P-Trap | Prohibited S-Trap | Bottle Trap |
|---|---|---|---|
| Typical Water Seal Depth | 2" to 4" | Unstable (0" to 4") | 2" to 3" (Internal Partition) |
| Drainage Orientation | Horizontal discharge to vent | Direct vertical drop through floor | Horizontal discharge |
| Siphon Risk | Extremely low when properly vented | Very high (self-siphoning) | Low (can clog on hair/solids) |
| Current Code Status | Universally required | Prohibited for >20 years | Allowed only under specific local exceptions |
| Primary Failure Point | Dry trap from long inactivity | Hydraulic siphoning after drainage | Internal baffle corrosion/clogs |
Reviewing standard code-compliant P-trap installation standards ensures that every rough-in matches inspection requirements.
Trap Seal Siphoning and Venting Dynamics
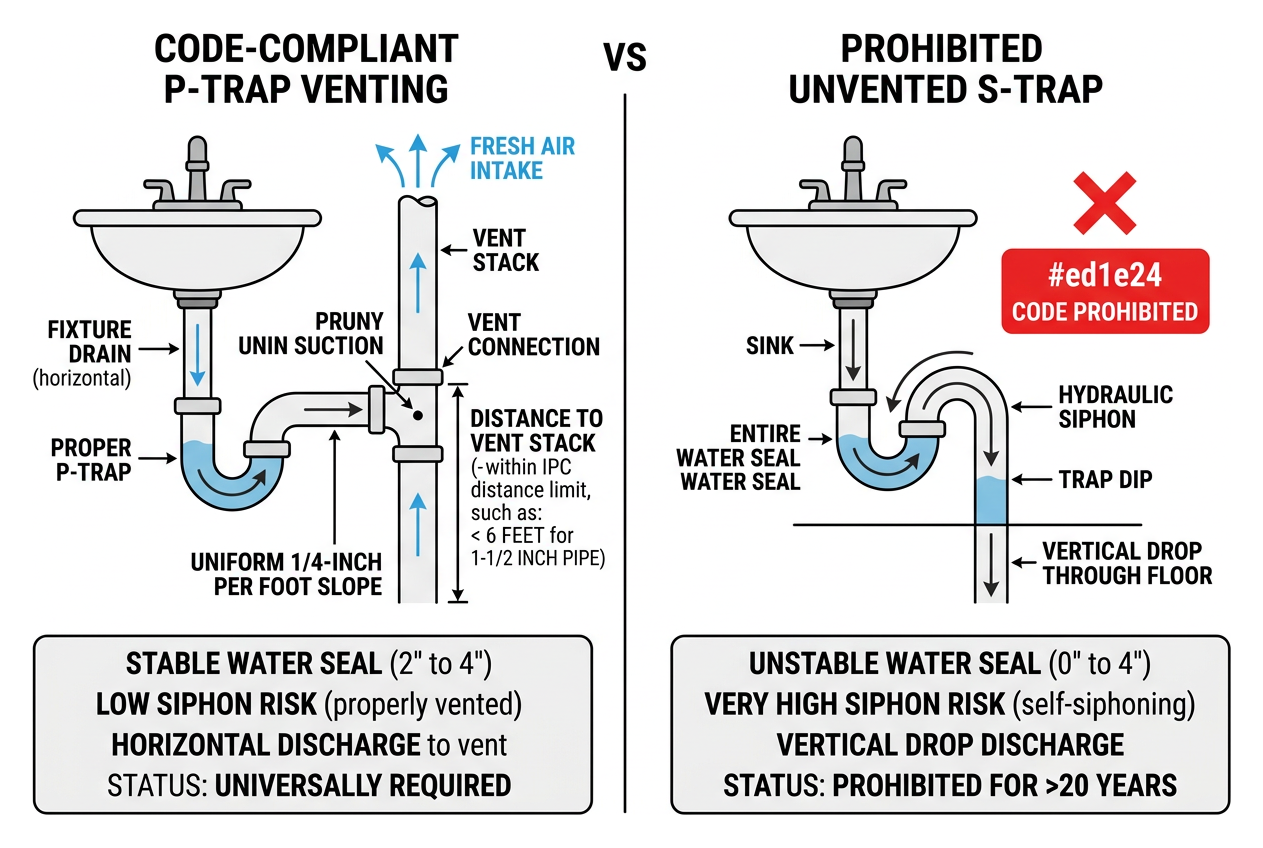
A trap cannot function without a balanced vent. When a fixture empties, the rush of water acts like a piston in the pipe, creating negative air pressure downstream. A proper vent stack introduces fresh air behind the water slug, neutralizing suction.
Without venting, the water rushing through a vertical drop pulls the remaining water seal right out of the trap dip—a process called self-siphoning. To master the physics of drain-waste-vent dynamics, always respect the critical distance between the trap weir and the vent stack. Under IPC rules, a 1-1/2-inch fixture drain must be located within 6 feet of its vent, pitched at a uniform 1/4-inch per foot slope. If the trap arm drops more than one pipe diameter before hitting the vent connection, it acts like an S-trap and breaks code.
Step-by-Step Installation & Assembly According to the Diagram
Installing a slip-joint trap takes 30 to 45 minutes using basic hand tools.
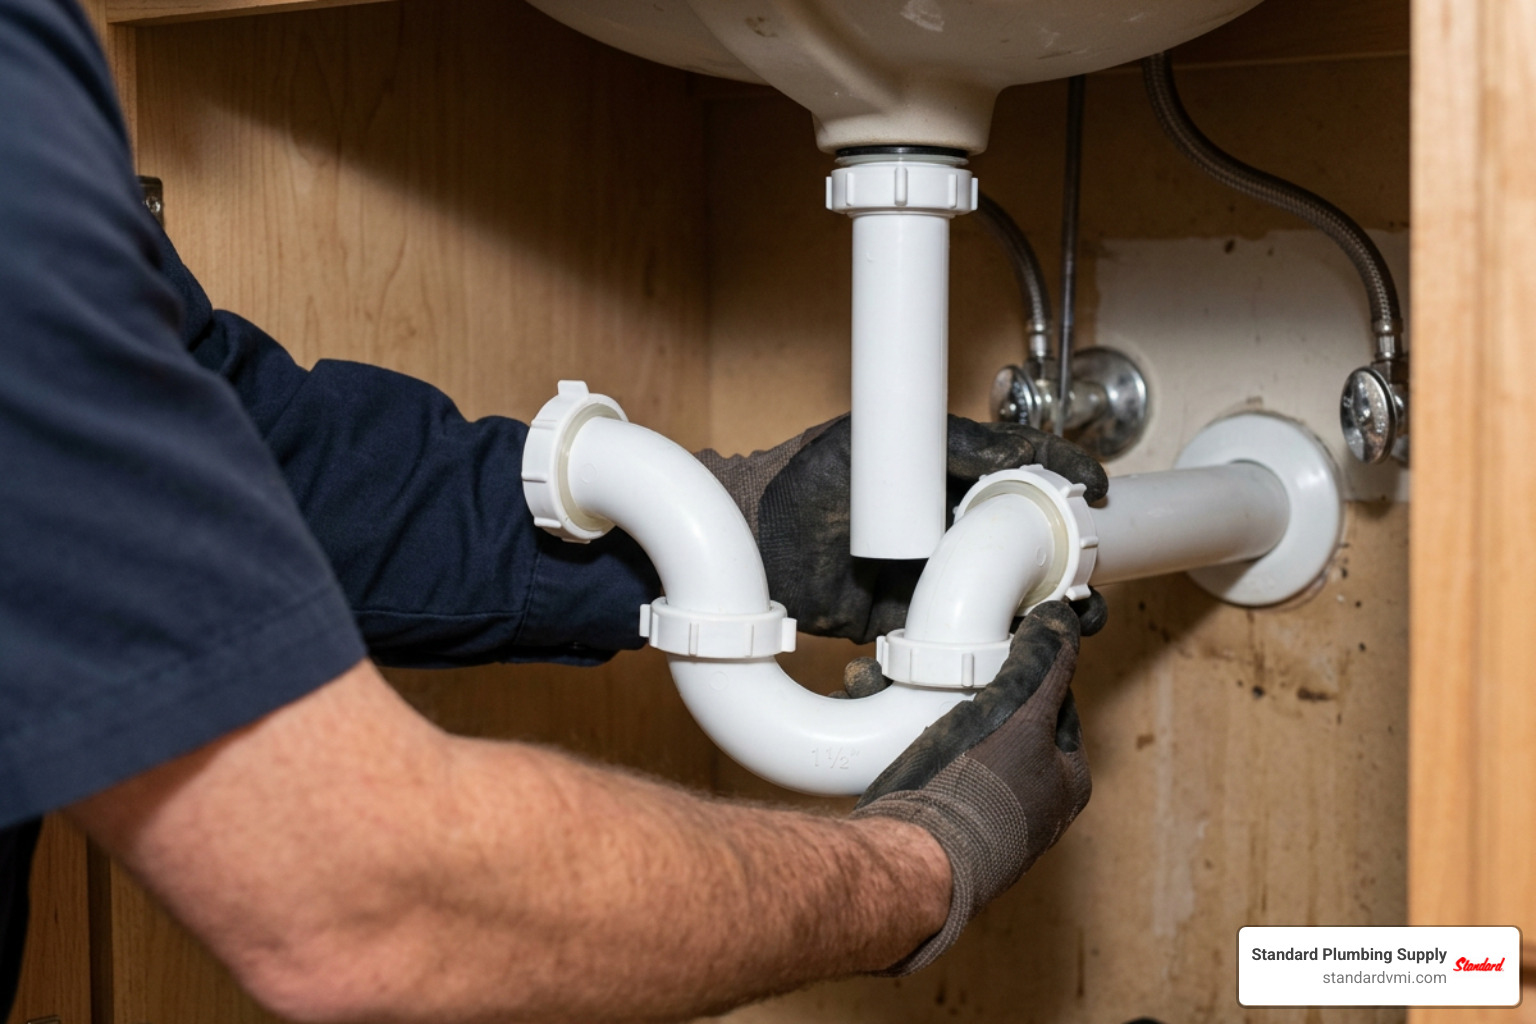
- Prep and Dry-Fit: Place a bucket beneath the fixture. Dry-fit the assembly by lining up the tailpiece, J-bend, and wall tube to check alignment.
- Measure and Cut: Mark the wall tube and tailpiece to length. Cut square using a fine-tooth hacksaw or tubing cutter, removing all interior burrs with a reamer or utility knife.
- Position Slip Nuts and Washers: Slide the slip joint nut onto the pipe first, followed by the beveled slip washer. The tapered (narrow) edge of the washer must always face toward the joint connection.
- Connect the Hardware: Slide the horizontal wall tube into the wall adapter. Drop the J-bend into place, securing it to the tailpiece and the wall tube.
- Tighten Connections: Hand-tighten all slip nuts. For metal fittings like a tubular brass P-trap, finish with a half-turn using tongue-and-groove pliers. For plastic PVC/polypropylene nuts, hand-tightening plus a quarter-turn with pliers is plenty—overtightening will crack the plastic threads.
- Pressure Test for Leaks: Fill the basin to the overflow rim, release the stopper, and let the full hydraulic column discharge while inspecting every joint with a dry paper towel.
Specialized Drain Configurations: Bathtubs, Showers, and Commercial Traps
While sinks rely on exposed slip-joint traps, below-floor fixtures require permanent, solvent-welded or mechanical connections:
- Bathtub Assemblies: Use a combined overflow and waste shoe leading into an ABS slip joint bath waste kit or direct solvent-weld PVC drain beneath the subfloor.
- Walk-in Showers: Integrate solvent-welded 2-inch PVC or ABS traps set directly below the shower base strainer to accommodate high drainage rates.
- Commercial and Industrial Waste Lines: Require heavy-duty solutions like a deep seal cast iron P-trap joined by no-hub mechanical couplings to handle corrosive chemical discharge and extreme thermal fluctuations.
Troubleshooting Common P-Trap Failures and Leaks
When a drain line develops issues, use your schematic to isolate the fault:
- Slip Joint Leaking at the Threads: Usually caused by a misaligned or backward washer. Loosen the nut, verify that the beveled edge points into the receiving hub, and retighten. Never wrap Teflon tape around slip-joint washer threads—the seal is created by washer compression, not thread engagement.
- Foul Sewer Odors (Dry Trap): If a basement sink, guest bath, or laundry box goes unused for weeks, ambient evaporation depletes the 2-inch water barrier. Running the faucet for 30 seconds restores the seal. For drains that sit idle for months, pouring an ounce of food-grade mineral oil over the water creates a floating film that prevents evaporation.
- Slow Drainage and Gurgling Sounds: Gurgling is a clear symptom of negative pressure caused by a clogged roof vent or a missing air admittance valve (AAV). If clearing the line with a hand snake does not resolve the slow drain, inspect the vent stack for roof blockages like leaves or debris.
Frequently Asked Questions About P-Trap Schematics
Why are S-traps prohibited by plumbing codes while P-traps are required?
S-traps drop vertically straight through the subfloor without a horizontal trap arm connected to a vent stack. When wastewater flows down that vertical drop, it creates a siphoning action that pulls the protective water seal out of the trap bend, leaving an open path for toxic sewer gases.
What is the correct slope and distance for a P-trap arm to the wall vent?
A trap arm must maintain a continuous downward slope of 1/4 inch per foot toward the sanitary tee. Under standard IPC rules, the maximum developed length between a 1-1/2-inch trap weir and the vent stack fitting is 6 feet (or 5 feet for a 1-1/4-inch vanity trap).
Which material is best for residential sink P-traps: PVC or brass?
Polypropylene/PVC is the industry standard for residential cabinets because it will not corrode, handles drain-cleaning acids safely, and installs quickly with slip-joint washers. Chrome-plated 17-gauge brass is preferred for exposed wall-mount or pedestal sinks where clean aesthetics are essential.
Conclusion
Understanding a plumbing p-trap diagram gives you the confidence to install, inspect, and maintain code-compliant drainage systems that stop sewer odors and prevent water damage. Whether you are roughing in a full residential subdivision, retrofitting commercial rest stops, or managing maintenance for multi-family units, using reliable DWV components guarantees clean inspections and long-term durability.
At Standard Plumbing Supply, we support trade professionals and property managers across the Western United States with extensive product inventories, top-tier brands, and experienced technical support. From residential vanity fittings to commercial PVC DWV P-traps, we deliver the parts you need with fast nationwide shipping. Contact your local branch or speak with our team today to streamline your project orders with customized vendor-managed inventory (VMI) solutions.