
Cheat Sheet to Identifying the Correct PVC DWV P-Trap
Learn how to select the correct PVC DWV P-trap for residential drainage, including trap mechanics, sizing, and code-compliant installation.

Understanding the Mechanics of a PVC DWV P-Trap
To identify the correct PVC DWV P-trap, first match the connection type to accessibility: solvent-weld traps for concealed spaces, union or cleanout styles for accessible under-sink installations, and size the trap to the fixture discharge (typically 1-1/2" for lavatories, 1-1/2" or 2" for kitchen sinks). Every fixture that carries wastewater relies on a trap to isolate indoor spaces from the hazards lurking inside municipal sewer mains and septic tanks. In non-pressure drain, waste, and vent (DWV) systems, the plumbing trap operates on a basic principle of gravity and liquid displacement. When wastewater flows down a fixture drain, it passes through the dip of the trap and spills over an internal ledge called the trap weir before heading downstream into the sanitary line.
Once water stops running, a calculated volume remains trapped in the low bend of the fitting, forming an airtight barrier known as the water seal. Plumbing codes across the country mandate this standing water barrier. Without it, the open drainage pipe acts as a direct chimney, allowing foul smells, sewer gases, and airborne pathogens to migrate straight into living or working spaces.
How Water Seals Block Hazardous Sewer Gases
The primary hazard of an unsealed drainage line is the infiltration of toxic gases, notably methane and hydrogen sulfide. Methane poses an ignition and asphyxiation risk in enclosed spaces, while hydrogen sulfide emits a distinct rotten-egg odor and can cause nausea, headaches, and respiratory irritation even at low concentrations.
A properly installed PVC DWV P-trap creates a hydraulic seal typically between 2 and 4 inches in depth:
- Trap Crown Weir: The lowest interior point of the horizontal outlet pipe.
- Trap Dip: The lowest inside curve of the fitting.
- Effective Seal Depth: The vertical distance between the dip's bottom surface and the crown weir.
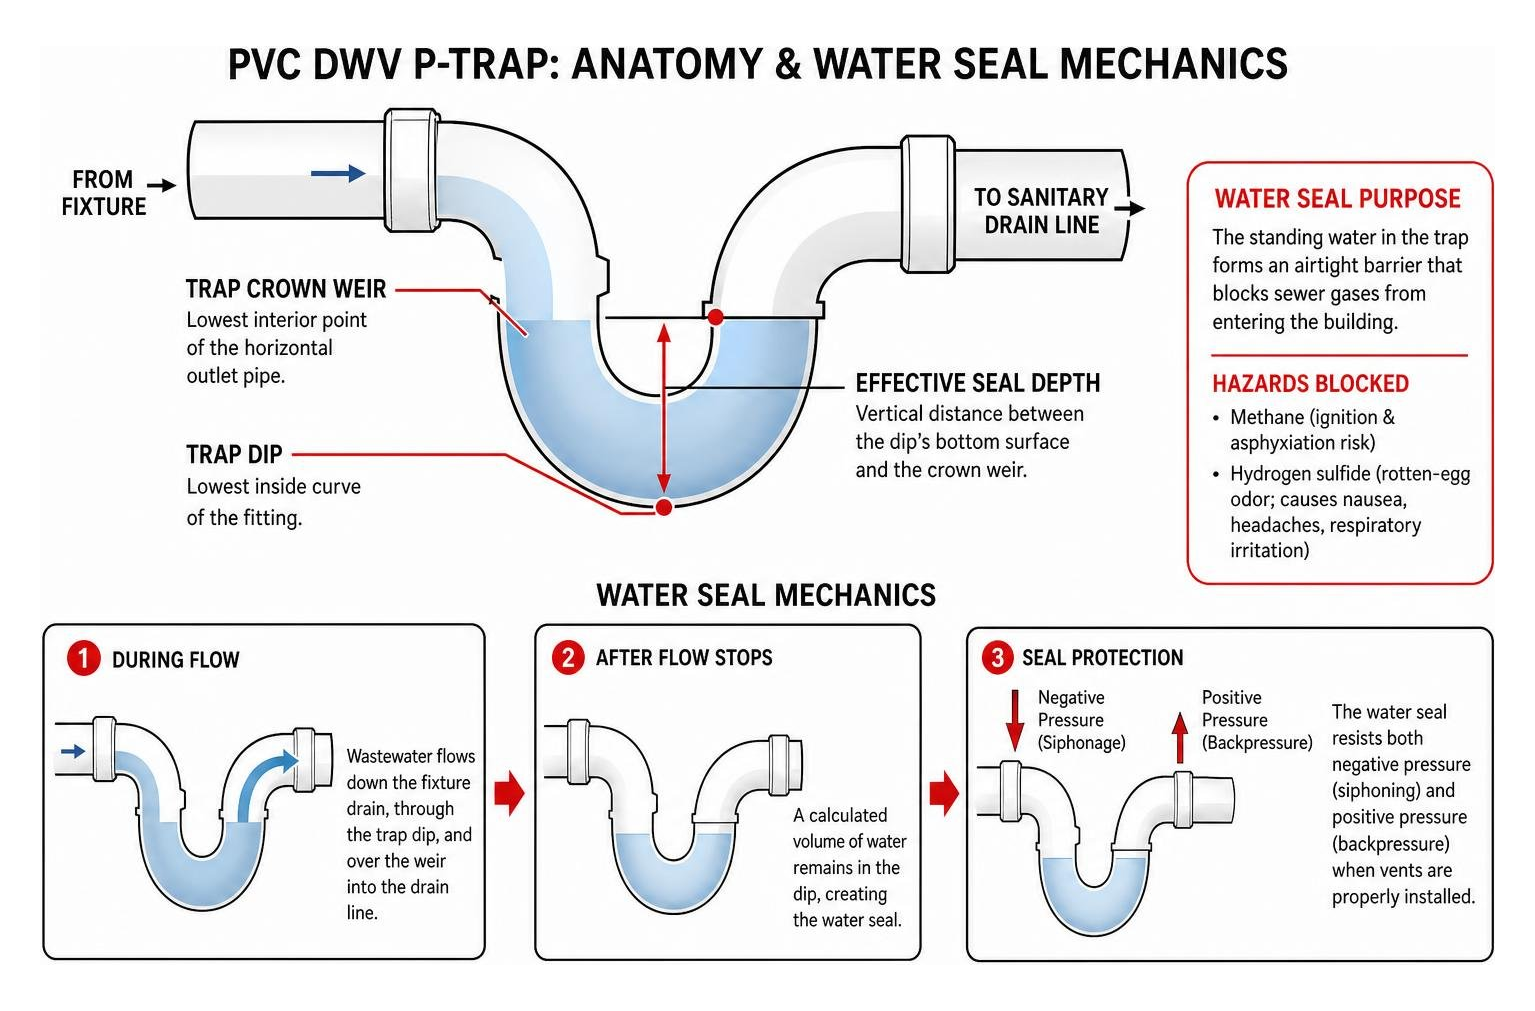
This liquid barrier resists both negative pressure (siphoning) and positive pressure (backpressure) caused by fixtures draining elsewhere in the building. When downstream venting is properly installed, air moves freely through the vent stacks to equalize pressure swings, preserving the water barrier within the trap bend.
Key Materials and Temperature Limits
White Schedule 40 PVC is the primary thermoplastic specified for residential and commercial DWV systems. It delivers smooth interior walls that minimize friction loss, resist build-up, and remain completely impervious to the corrosive acids, rust, and scale that degrade traditional cast iron or galvanized pipes.
When tying a new trap into building drainage, matching materials is essential. Contractors frequently pair these fittings with rigid schedule 40 PVC pipe to maintain structural integrity throughout the run.
However, standard PVC DWV fittings have operational limits:
- Operating Temperature: Rated for non-pressure drainage applications up to a maximum continuous temperature of 140°F (60°C).
- Pressure Rating: Non-pressure drainage only. DWV fittings should never be subjected to pressurized air or water testing exceeding manufacturer and local code thresholds.
- Chemical Exposure: While highly resistant to household cleaning agents, excessive exposure to harsh industrial solvents can weaken the polymer bonds over time.
Primary Configuration Options and Design Types
Not all P-traps connect to drainage systems in the same way. Selecting the wrong joint type can turn routine service into a major plumbing overhaul. The three main styles available in DWV plumbing are standard solvent-weld traps, union-joint traps, and traps featuring mechanical cleanout adapters.
| Feature / Trait | Standard Solvent Weld Trap | Union Joint P-Trap | Cleanout Adapter P-Trap |
|---|---|---|---|
| Primary Connection | Hub x Hub solvent cement | Hub x Union (Threaded Collar) | Hub x Hub with bottom FIPT plug |
| Service Disassembly | Requires cutting the pipe | Unthreads by hand or wrench | Bottom plug removes for clearing |
| Leak Vulnerability | Lowest (permanent joint) | Low (requires intact seal face) | Low (threaded O-ring/gasket/tape) |
| Typical Location | In-wall or subfloor spaces | Under-sink accessible cabinets | Exposed sink drains, utility fixtures |
| Code Requirement | Approved for concealed spaces | Must remain accessible | Must remain accessible |
Standard Solvent Weld vs Union Joint Connections
A standard solvent-weld trap features hub-by-hub (socket) ends that chemically fuse directly to the incoming fixture tailpiece extension and the downstream trap arm. These models—such as the NIBCO standard hub trap—form a permanent, monolithic bond that cannot vibrate loose or leak under normal conditions. Because they lack mechanical seals, standard solvent-weld traps are the only style approved by most plumbing codes for installation inside concealed ceiling, wall, or subfloor spaces.
For accessible installations beneath kitchen sinks, bathroom vanities, and laundry trays, union-joint traps provide added flexibility. A union joint incorporates an integrated plastic nut and mating bevel face along the U-bend. By loosening this single nut, you can detach the entire lower curve of the trap without cutting any pipe.
When transitioning between different pipe configurations in tight cabinet enclosures, installers often rely on a PVC hub street fitting to make clean, compact turns straight out of the trap weir into the sanitary wall tee. For fixtures using slip-joint connections, fittings like the NIBCO hub x slip-joint trap make it easy to mate schedule 40 drainage with lighter gauge tubular tailpieces.
Selecting a PVC DWV P-Trap with Cleanout Adapter
A cleanout adapter model features an integrated threaded port located at the lowest curve of the U-bend. Outfitted with a removable threaded cleanout cap, this design provides direct access to the interior of the trap and the downstream trap arm.
Cleanout adapter P-traps allow technicians to clear hair clogs, retrieve dropped items, or run a small snake directly into the waste line without taking the entire drainage assembly apart.
When positioning a cleanout trap:
- Ensure the bottom plug faces forward or downward with at least 3 to 4 inches of open clearance below it to accommodate a collection bucket.
- Lubricate the cleanout plug threads with PTFE-safe thread paste to prevent seizing over time.
- Verify that the cleanout port remains unobstructed by cabinet dividers, pull-out drawers, or disposal units.
Best Practices for Sizing, Installation, and Maintenance
Proper drainage performance relies on matching the trap size to the fixture unit discharge rating, maintaining an accurate trap arm slope, and adhering to strict vent distances.
- Sizing Rules: Bathroom lavatory sinks typically utilize 1-1/4-inch tailpieces adapting to 1-1/2-inch traps, while kitchen sinks, laundry tubs, and commercial prep sinks require a full 1-1/2-inch or 2-inch trap assembly.
- Trap Arm Slope: Pitch the horizontal trap arm downward toward the vent stack at a consistent grade of 1/4-inch per foot. An excessive slope creates an S-trap effect that pulls the water seal dry via siphonage, while an inadequate slope allows solids to settle and form blockages.
- Maximum Distance to Vent: For a standard 1-1/2-inch trap, the maximum developed pipe length between the trap weir and the vent fitting is generally 6 feet (check local administrative codes for regional variations).
Step-by-Step Installation of a PVC DWV P-Trap
Installing a solvent-weld PVC DWV P-trap requires careful dry-fitting, square pipe cuts, and proper chemical bonding.
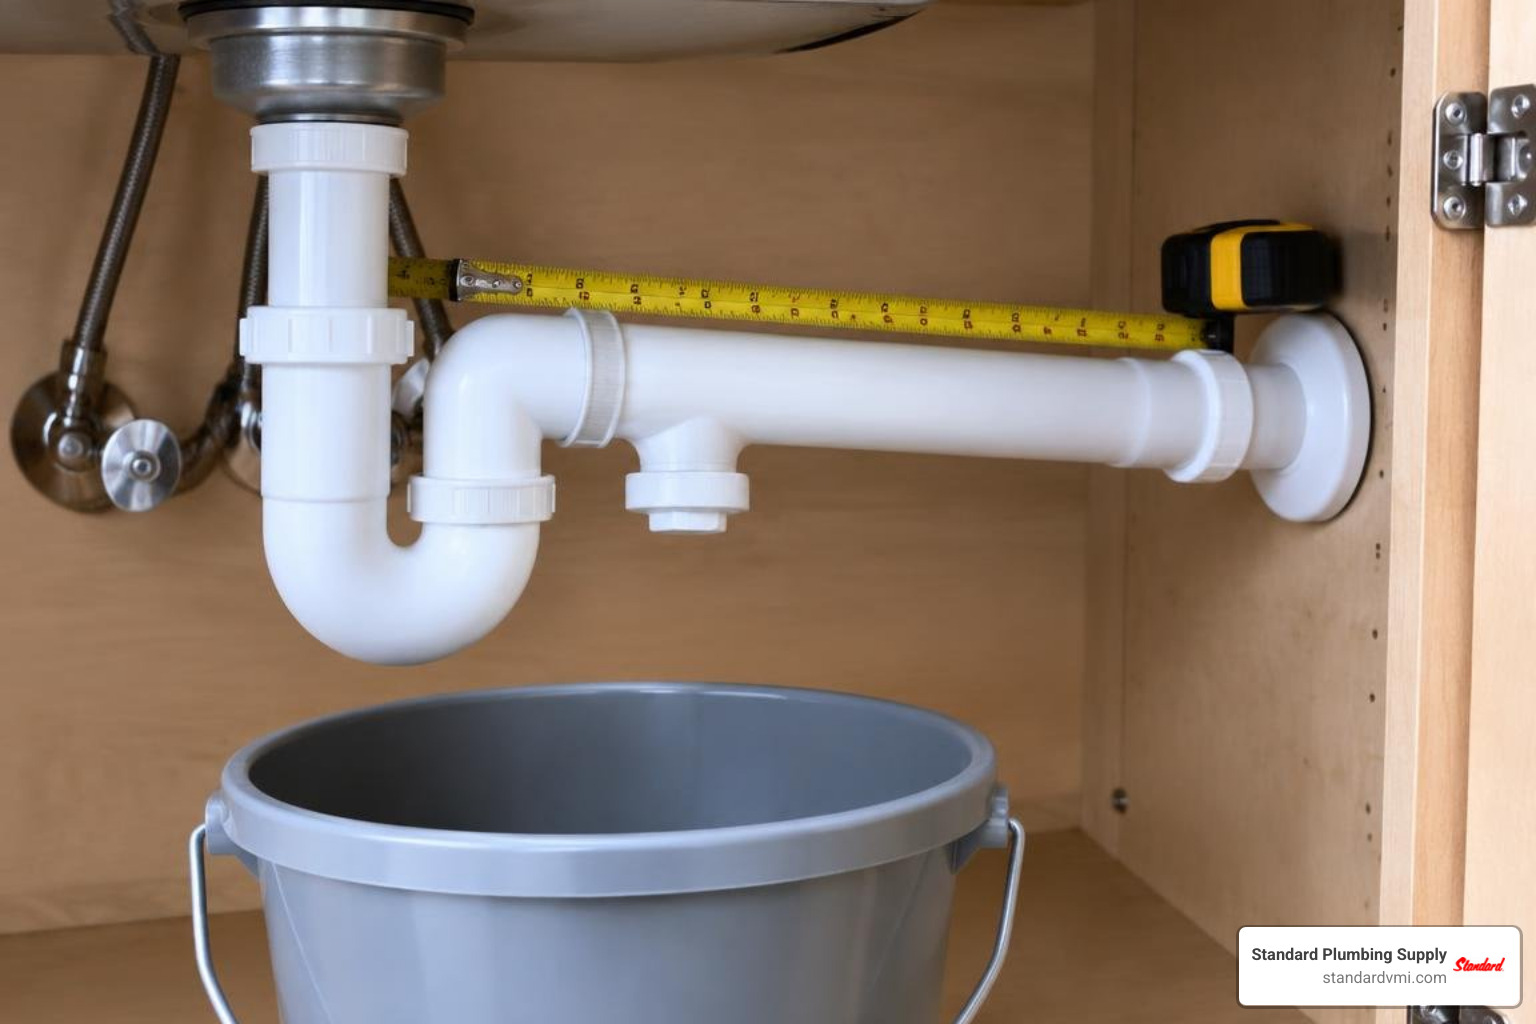
- Cut the Pipe to Length: Measure the distance between the fixture tailpiece and the wall sanitary outlet. Cut the Schedule 40 PVC pipe using a heavy-duty PVC ratchet cutter or fine-tooth saw, ensuring the cut is square.
- Ream and Deburr: Use a deburring tool or utility knife to scrape all plastic shavings and burrs from both the inside and outside edges of the pipe cut. Burrs collect hair and debris, accelerating clog formation.
- Dry-Fit the Entire Assembly: Assemble the trap, tailpiece adapter, and trap arm without glue to check alignment. Ensure the trap arm maintains a 1/4-inch-per-foot downward pitch toward the wall connection and that the trap hangs plumb.
- Apply Purple Primer: Mark alignment lines with a pencil. Disassemble the components and apply a uniform coating of purple PVC primer to the inside of the fitting socket and the outside of the pipe end. Primer cleans the gloss off the PVC and softens the material for bonding.
- Apply Solvent Cement: While the primer is still wet, apply an even layer of medium-bodied PVC solvent cement to the pipe exterior and a thin layer inside the fitting hub.
- Insert and Quarter-Turn: Immediately push the pipe fully into the fitting socket until it seats against the internal stop, twisting 90 degrees to spread the cement evenly. Hold the joint firmly in place for 15 to 30 seconds to prevent the tapered socket from pushing the pipe back out.
- Allow to Cure and Test: Let the solvent cement cure according to manufacturer instructions (typically 15 minutes for handling and 2 hours for testing at room temperature). Run water through the fixture for 2 minutes while checking all joints with a dry paper towel for any signs of moisture.
Maintenance, Clearing Clogs, and Common Mistakes
A properly configured trap requires minimal day-to-day attention, but improper installation and aggressive clearing methods can compromise your DWV system.
When cleaning out severe commercial or multi-family waste blockages, technicians use specialty drain machines equipped with carbide chain knocker snake cables. While these tools work well on main stacks, they can fracture light-gauge under-sink traps. Always snake downstream through a cleanout port rather than forcing large cutting heads directly through the tight U-bend of an installed trap.
Frequently Asked Questions About DWV Traps
What size trap is required for standard residential sinks?
Residential bathroom lavatories almost always use a 1-1/2-inch trap connected to a 1-1/4-inch fixture tailpiece via a reducing slip-joint washer. Kitchen sinks, commercial bar sinks, and laundry tubs require a minimum 1-1/2-inch nominal trap size to handle higher flow rates and food waste loads.
How do you service a clogged trap without cutting the pipe?
If your system uses a union-joint fitting or a cleanout-equipped P-trap, place a small bucket beneath the assembly and unthread the bottom plug or the union collar. For solid solvent-welded assemblies without a cleanout, the fixture must be cleared using a manual auger fed down through the sink pop-up or strainer basket.
Why does a drain trap lose its water seal?
Water seal loss generally happens for three reasons:
- Evaporation: Fixtures left unused for weeks in dry or hot climates lose their standing water to ambient evaporation.
- Siphonage: An unvented or improperly sloped trap arm causes draining water to pull the remaining liquid barrier down the pipe.
- Capillary Action: String, hair, or lint lodged over the crown weir can slowly wick water out of the trap bend into the drain line.
Keep Your Drainage Systems Reliable and Code-Compliant
Installing the right PVC DWV P-trap protects building occupants from sewer gases, prevents costly leaks, and simplifies maintenance. By selecting the correct size, confirming accessibility for cleanouts, and following approved solvent-welding procedures, you ensure a long-lasting, code-compliant drainage system.
Whether you are roughing in a single bathroom or stocking inventory for large commercial projects, we carry a full selection of DWV pipe, fittings, and accessories—from residential slip-joint adapters to a heavy-duty 4-inch PVC DWV p-trap for main building waste lines. With fast shipping, knowledgeable counter support, and complete Vendor-Managed Inventory (VMI) services across our western branch locations, we help plumbing professionals keep every job running smoothly and on schedule.