
Sink Push Plug Replacement: No More Stuck Basin Plugs
Learn how to perform a sink push plug replacement with our step-by-step guide to fix stuck or leaking basin plugs.

Why Your Sink Push Plug Replacement Matters More Than You Think
A sink push plug replacement is one of the simplest plumbing fixes you can do yourself — and one of the most satisfying. No more wrestling with a stuck basin plug or crawling under the sink to fiddle with rods and clips.
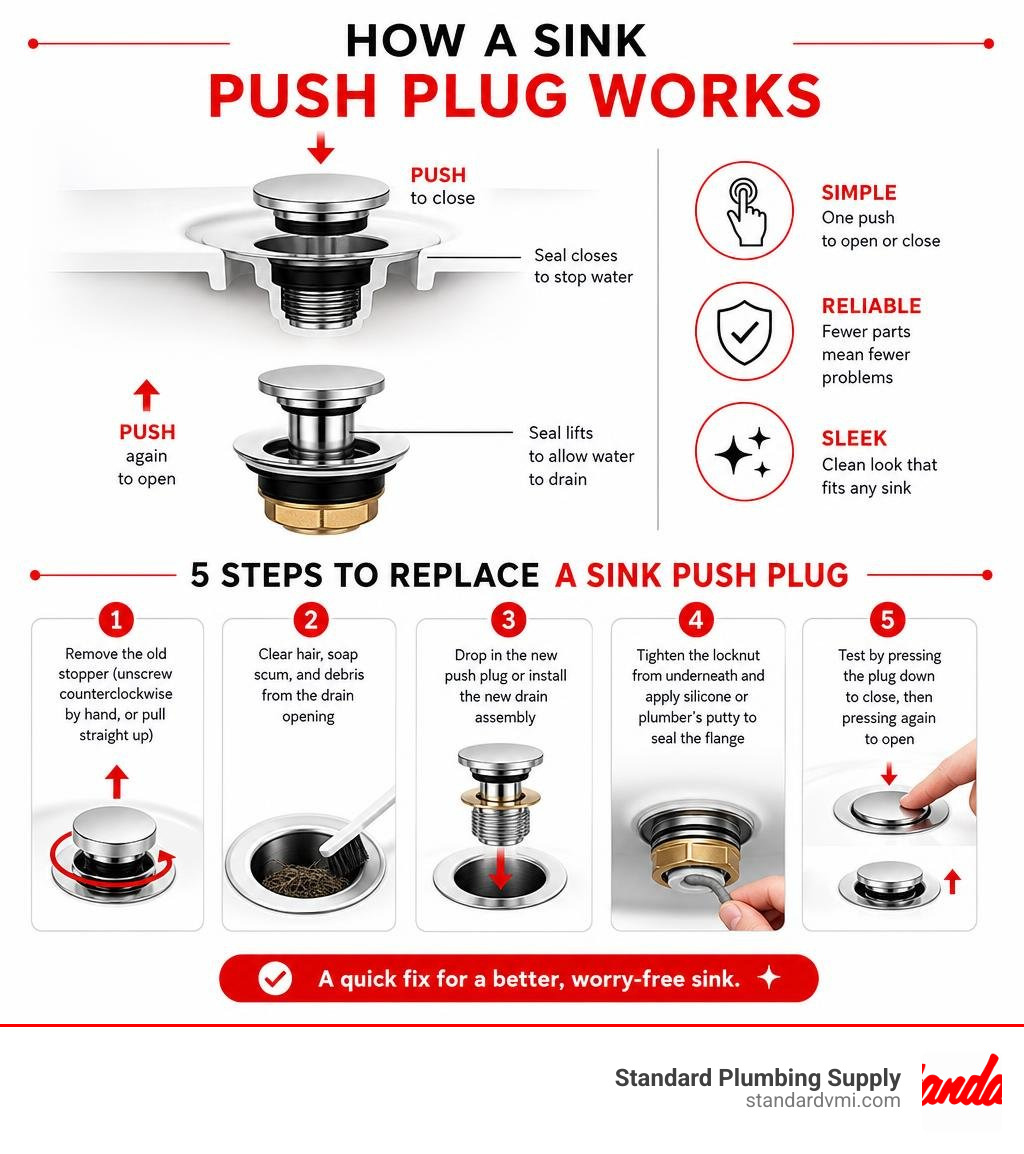
Here's how to replace a sink push plug in 5 steps:
- Remove the old stopper (unscrew counterclockwise by hand, or pull straight up)
- Clear hair, soap scum, and debris from the drain opening
- Drop in the new push plug or install the new drain assembly
- Tighten the locknut from underneath and apply silicone or plumber's putty to seal the flange
- Test by pressing the plug down to close, then pressing again to open
Quick tip: Over 80% of sink stopper problems are caused by clogs or a loose connection — not a broken plug. Always clean and inspect before buying a replacement.
Push plug replacements typically cost under $20 as a DIY job. A plumber visit for the same fix can run $100–$250.
Whether you manage one bathroom or an entire property, a failed plug is a fast fix when you have the right part on hand.
I'm Jacob Reese, Vice President at Standard Plumbing Supply in Salt Lake City, Utah — and through years of working with contractors and property managers sourcing everything from basic drain components to full plumbing assemblies, I've seen how a straightforward sink push plug replacement can go sideways fast when you're working with the wrong part or missing key installation steps. In this guide, I'll walk you through exactly what to do, from identifying the right replacement to getting a leak-free seal the first time.
Understanding Sink Push Plugs vs. Traditional Pop-Up Drains
Before disassembling your bathroom plumbing, it is helpful to understand the mechanism you are working with. Many older homes throughout Utah, Idaho, and Oregon still feature traditional pop-up drains, but modern renovations almost exclusively favor the streamlined push-button design.
What is a Sink Push Plug?
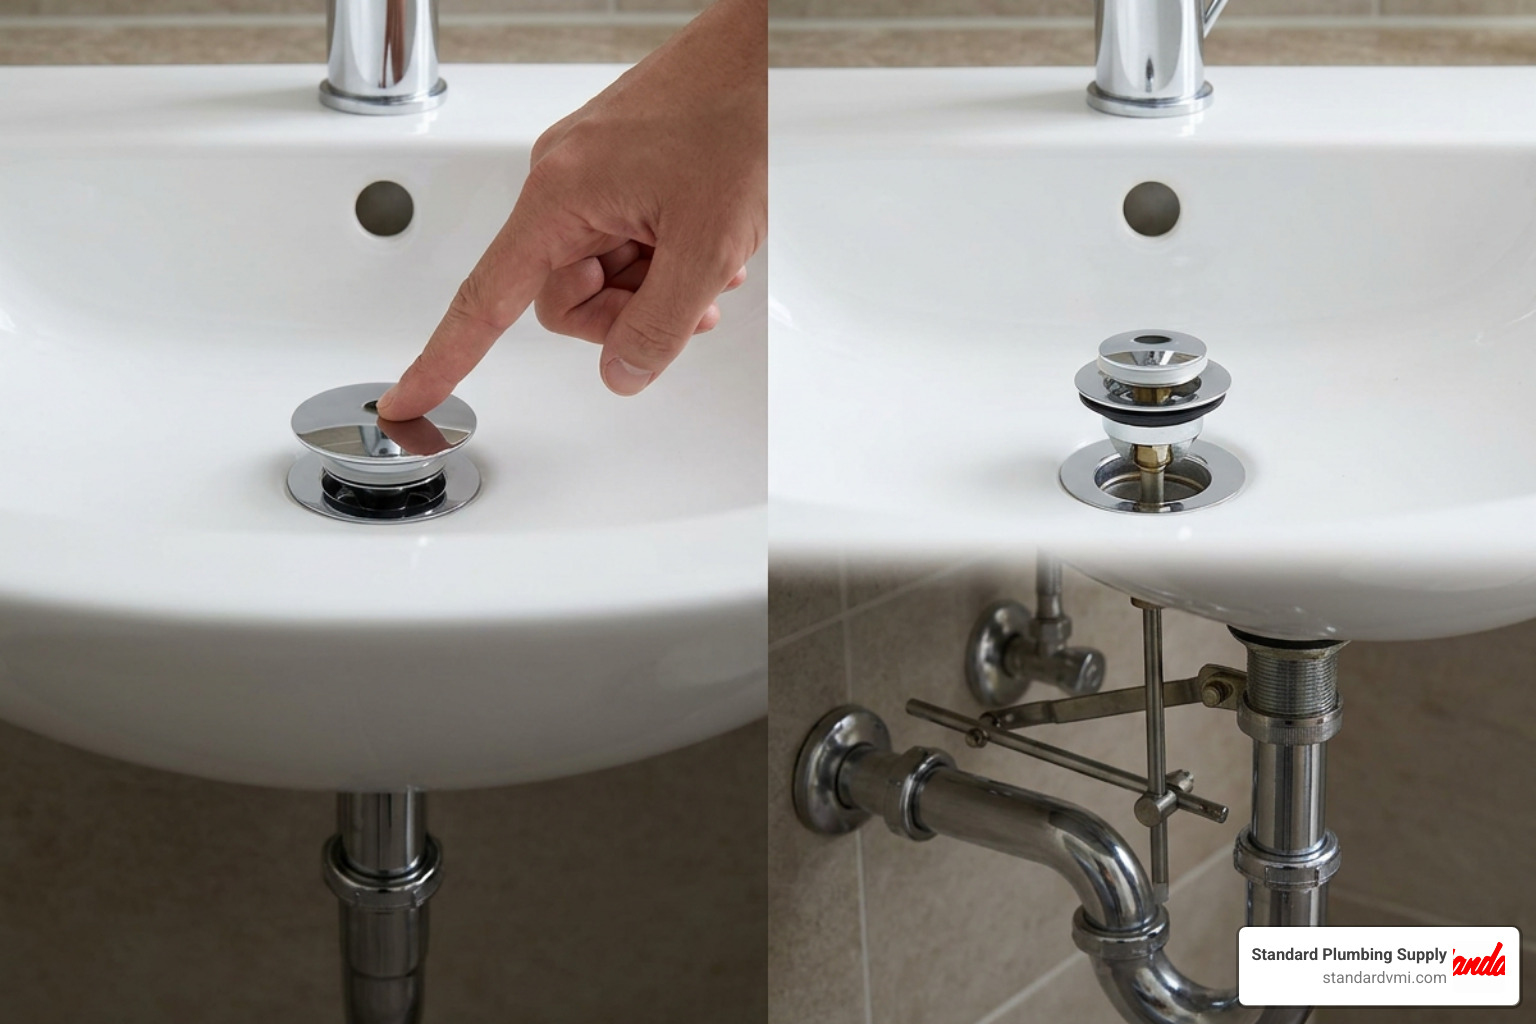
A push plug, also known as a click-clack plug or push-button drain, operates on a self-contained internal spring mechanism. Unlike traditional drains, which rely on a series of levers behind the faucet, a push plug functions entirely within the drain basin itself.
When you press down on the stopper, a compression lock engages, sealing the basin waste completely. Pressing it a second time releases the spring cartridge, allowing water to flow freely.
This design eliminates the need for:
- A vertical lift rod behind the faucet
- A clevis strap under the sink
- A horizontal pivot rod extending into the drain pipe
- A spring clip to hold the rods together
Because there are no metal rods penetrating the drain pipe, push plugs significantly reduce the risk of slow leaks occurring under your vanity.
| Feature | Traditional Pop-Up Drain | Push Plug (Click-Clack) |
|---|---|---|
| Operation | Lift rod behind the faucet | Push down to close, push to open |
| Under-Sink Components | Lift rod, clevis strap, pivot rod, spring clip | None (completely self-contained) |
| Installation Complexity | Moderate to High (requires linkage alignment) | Low (drop-in or simple screw-in) |
| Clog Risk | High (hair wraps around the pivot rod) | Low (usually features an integrated basket) |
| Maintenance | Requires crawling under the sink | Cleaned entirely from above the basin |
Cost and Maintenance Differences
When evaluating the long-term cost of plumbing maintenance, push plugs are highly cost-effective. A complete, high-quality replacement assembly like the Pfister Polished Chrome Push & Seal Bathroom Sink Drain is designed for tool-free installation and can be maintained entirely from above the sink.
If you only need to convert an existing rod-style drain without replacing the entire tailpiece, a universal converter like the Push Easy 3.5 in. Universal Pop-Up to Push Drain Converter Stopper offers an affordable way to modernize your sink.
Traditional pop-up assemblies have more failure points. Over time, the horizontal pivot rod corrodes, or the spring clip slips, requiring you to crawl into the back of your vanity cabinet to make adjustments. With a push-button mechanism, you avoid these tight-space hassles entirely.
When to Perform a Sink Push Plug Replacement
Over time, daily exposure to soap scum, toothpaste, hair, and mineral-heavy water takes a toll on your bathroom fixtures. Knowing when to clean your plug versus when to perform a full sink push plug replacement will save you both time and money.
Signs of a Failing Spring Mechanism
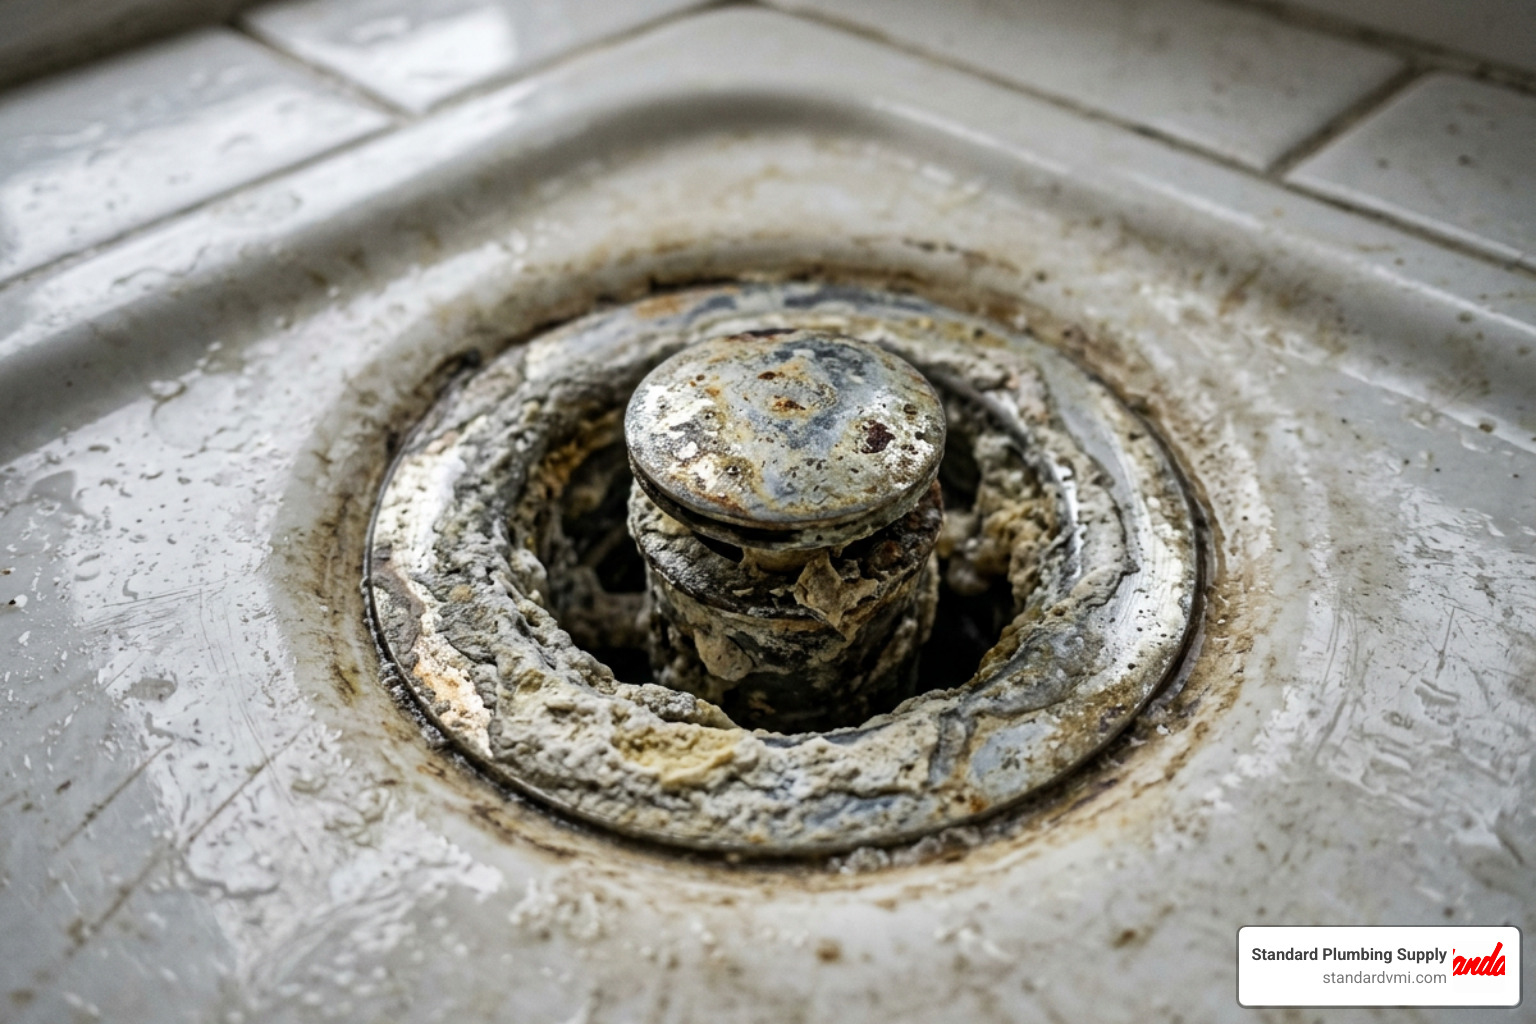
If you live in a hard water area—such as many municipalities across Utah and Arizona—mineral buildup is the leading cause of click-clack failure.
You likely need a replacement if you notice:
- The plug is stuck closed: You press the plug, but the spring mechanism fails to click back up, leaving water trapped in the basin.
- The plug will not seal: You press the plug down, but it springs right back up, or the compression lock fails to hold water.
- Slow drainage: Even when fully open, the stopper does not rise high enough to allow rapid water flow.
- Limescale corrosion: The internal brass or plastic spring cartridge has corroded to the point where it no longer moves smoothly, even after cleaning.
Choosing a Universal Sink Push Plug Replacement
When selecting a replacement, you must determine whether you need a simple "drop-in" stopper or a complete drain assembly replacement.
- Drop-In Converter Stopper: If your existing drain flange and tailpiece are in good condition, you can use a universal converter. The PushEasy – PF Water Works system allows you to upgrade your stopper without disassembling any pipe connections.
- Full Drain Assembly: If your current drain is leaking underneath the sink or the metal flange is heavily corroded, a full assembly replacement is necessary.
Before purchasing a full assembly, measure your sink's drain opening. Most standard bathroom sinks feature a 1-1/4 inch (1.25 in.) drain opening, though some decorative or vessel sinks may require a 1.5 inch or larger assembly.
Additionally, check if your sink has an overflow hole (the small opening near the rim of the basin). Sinks with an overflow require a drain body with an open collar to allow overflow water to drain. Sinks without an overflow, such as many vessel or farmhouse basins, require a solid-walled drain body to prevent leaks.
For standard 1.25-inch setups, options like the Push and Seal 1.25 in. Plastic Drain Assembly in Brushed Nickel provide a reliable, watertight fit.
Step-by-Step Guide to Sink Push Plug Replacement
Replacing a drain assembly is a straightforward project that typically takes less than 30 minutes.
Tools and Materials Needed
- New push-button drain assembly
- Adjustable spanner or slip-joint pliers
- Bucket and old towels (to catch standing water)
- Plumber's putty or high-quality silicone sealant
- Multi-purpose lubricant or penetrating oil (if removing a stuck, rusted drain)
Removing the Old Drain Assembly
- Clear the Space: Empty the vanity cabinet and place a bucket directly under the P-trap to catch any residual water.
- Disconnect the Linkage (If replacing a traditional pop-up): Go under the sink and unscrew the retaining nut holding the horizontal pivot rod to the drain pipe. Pull the rod out to release the old stopper from the basin.
- Disconnect the P-Trap: Unscrew the slip-joint nuts connecting the P-trap to the drain tailpiece. Gently pull the trap away and empty any water into your bucket.
- Unscrew the Locknut: Underneath the sink basin, locate the large mounting nut (locknut) securing the drain flange. Use your adjustable spanner to loosen this nut by turning it counterclockwise. If it is rusted solid, apply a small amount of penetrating oil and let it sit for 10 minutes.
- Push and Remove the Flange: Once the locknut is removed, push the tailpiece up through the bottom of the sink. From above the basin, grab the drain flange and pull the entire assembly out.
- Clean the Basin: Use an old toothbrush and a non-abrasive cleaner to scrub away any old plumber's putty, silicone, or mineral buildup around the sink's drain opening. A clean surface is essential for a watertight seal.
Installing the New Sink Push Plug Replacement
-
Prepare the Flange: Unbox your new assembly. Most modern kits, such as the Push and Seal 2.19 in. Plastic Drain Assembly in Polished Chrome, include a foam or rubber gasket designed to sit under the upper flange.
Pro Tip: Many professional installers discard the thin foam gasket included with some drains and opt for traditional plumber's putty or a 1/4-inch bead of 100% silicone under the flange. This ensures the flange sits completely flush with the bottom of the basin, preventing water from pooling around the drain.
-
Insert the Drain Body: Lower the new drain tailpiece through the drain opening from above the sink, ensuring any logo or alignment markings face forward. If your sink has an overflow, make sure the overflow holes in the drain body line up with the sink's internal overflow channel.
- Secure Underneath: Slide the rubber washer, friction washer, and metal locknut onto the tailpiece from underneath the sink. Hand-tighten the locknut clockwise until it is snug against the bottom of the basin.
- Final Tightening: Use your slip-joint pliers or adjustable spanner to tighten the locknut an additional half-turn. Do not over-tighten, especially when working with plastic drain bodies, as this can crack the threads or the sink basin itself.
- Reconnect the P-Trap: Realign your P-trap with the new tailpiece and tighten the slip-joint nuts by hand, followed by a light turn with pliers.
- Test the Seal: Wipe away any excess putty or silicone that squeezed out around the top flange. Close the new push plug, fill the basin with water, and let it sit for a few minutes. Check under the sink for any signs of dripping. Finally, release the plug and ensure the water drains quickly without leaking from the P-trap connections.
Troubleshooting and Maintenance Tips
Even with high-quality components, minor issues can arise during or after installation. Here is how to keep your new drain operating smoothly.
How to Fix a Leaking or Stuck Plug
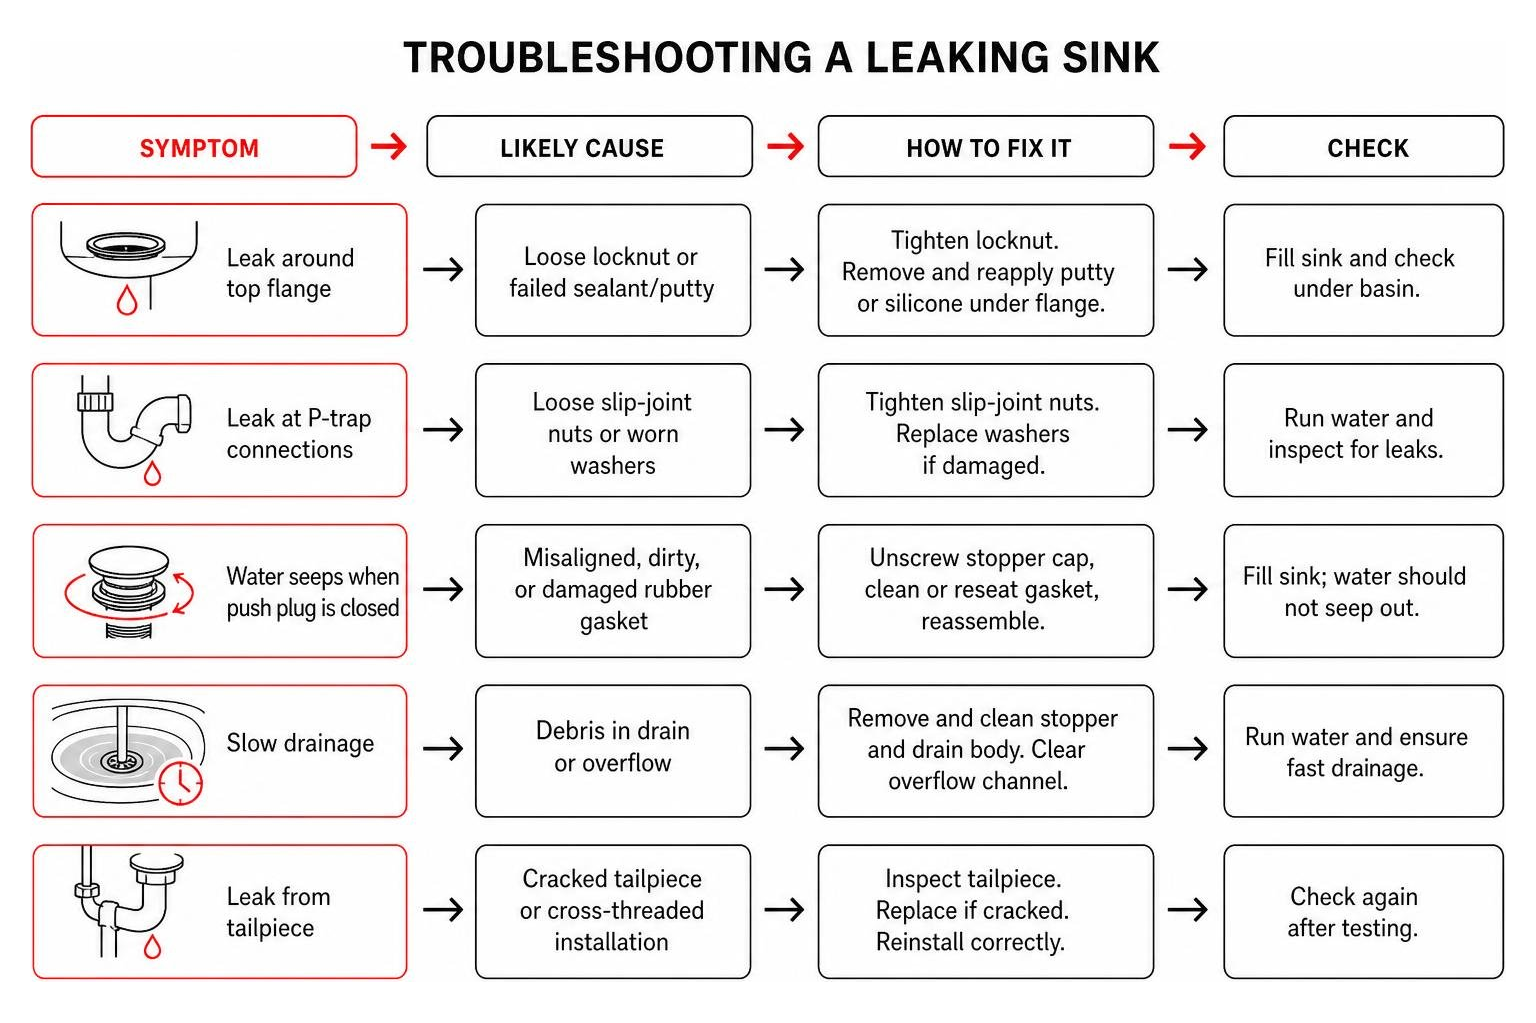
If you experience issues with your new system, use these troubleshooting steps:
- Water slowly drains out of the basin when closed: This is typically caused by a misaligned rubber gasket on the stopper cap. Unscrew the stopper cap counterclockwise, inspect the rubber seal for twists or debris, and screw it back on. Under plumbing standards like ASME A112.18.1, a minor slow seep (up to 1 gallon per hour under 6 inches of water) is technically permitted, but a proper seal should hold water indefinitely for normal household use.
- The plug won't spring back up: If your plug gets stuck in the down position shortly after installation, the stopper cap may be threaded too tightly onto the internal stem. This compresses the spring cartridge and prevents it from releasing. Loosen the stopper cap by turning it slightly counterclockwise to free up the spring mechanism.
- Leaking under the sink flange: If water is dripping from the locknut under the basin, the upper flange seal is compromised. You will need to loosen the locknut, push the flange up, and apply a fresh bead of silicone or plumber's putty beneath the upper flange before retightening.
Cleaning and Extending Lifespan
To prevent future clogs and keep your click-clack mechanism working perfectly, we recommend a simple maintenance routine every 6 to 12 months:
- Remove the Stopper: Most modern push plugs, including the Push Pop-Up with Overflow in Chrome 33W576 | Delta Faucet, allow you to unscrew the stopper cap counterclockwise by hand for quick cleaning.
- Clear the Hair Catcher: If your model features a built-in basket, pull it out and clear away any trapped hair or soap scum.
- Remove Limescale: If you live in an area with hard water, soak the removed stopper and spring cartridge in a cup of white vinegar or limescale remover for 15 to 20 minutes. Use an old toothbrush to scrub away stubborn mineral deposits.
- Lubricate the Spring: Apply a light coat of multi-purpose waterproof lubricant or silicone grease to the top of the spring mechanism before reassembling to ensure smooth, click-clack operation.
Conclusion
A sticky, leaking, or broken sink plug does not require an expensive service call. With a few basic tools and a high-quality sink push plug replacement assembly, you can restore your bathroom sink's functionality in under half an hour.
At Standard Plumbing Supply, we are proud to serve residential DIYers, professional contractors, and commercial property managers across Utah, Idaho, Oregon, Arizona, California, Wyoming, Nevada, Colorado, and Nebraska. Whether you need a single replacement stopper or are managing a large-scale renovation, we provide the expert support, trusted brands, and fast shipping you need to get the job done right.
Are you a contractor or property manager looking to streamline your operations? Optimize your inventory with our VMI solutions to reduce overhead, free up cash flow, and ensure your team always has the right plumbing fixtures on hand. Stop by one of our convenient locations—including our fully stocked branch in South Salt Lake, Utah—or browse our online catalog today to find the perfect parts for your next project.